Beauty photos without flash, studios or techy stuff!

How often do you see beautifully lit magazine shots and think – wow, I’d love to be able to take photos like that?
We all know that models in magazines have a team of stylists and lighting technicians creating the pictures, but a similar look can be achieved without all that fuss!
When I first started my career I shot in a studio, with lights, and huge softboxes to create fabulous beauty lighting. It was wonderful light, but became very boring doing the same thing every day, in the same studio. The only things that changed were the people, and occasionally the sets. And the biggest frustration was worrying whether the lights would work consistently. I spent many a shoot chewing the end of a synch lead, and trying to make the flash go off! Breaks the rapport with the client slightly every time!
One day I decided I’d had enough and ventured outside into the big wide world! I discovered all sorts of backgrounds and became instantly inspired! It was raining, and cold and all sorts of problems suddenly arose from being out of my comfort zone. But I loved it! I loved the creativity that came from not knowing where I was going to shoot, and I was like a kid in a sweetshop – everywhere I looked there was another wonderful background! So I was determined to find a way to create beautifully lit images outside without the technical lighting I used inside.
This shoot will show you how easy it is, if you are prepared to get wet and work hard!
One of my very first makeover clients was a beautiful girl called Sarah, who travelled to my studio having seen a feature I did on BBC’s The Clothes Show. 20 years later Sarah telephoned me asking if I could do a similar shoot for her 18-year-old daughter, Libby.
Over the past 20 years, many things have changed – from makeup and hair to fashion and, of course, technology – but one thing never changes – women always want to look beautiful in their photographs.

Libby is a very pretty girl, but many people’s Facebook pictures don’t always do them justice, particularly when shot with harsh flash. We wanted to show her how she could look really amazing on photographs, given the right lighting and positioning.
So off I went to Northamptonshire on a very wet and cold day with no lights, no flash, and no softboxes – just my cameras and my wonderful make up artist Karen Fundell.
Note: A make up artist will make a big difference on this kind of shoot – but all the tips and techniques on this blog can be used for getting great photos of anyone, even without a make up artist.
Timetable for the day
9.00: Libby goes into make up with Karen – Annabel checks out the locations.
9.30: Sarah and Annabel go through Libby’s clothes selecting different outfits that will work with the chosen locations.
10.00: Libby’s makeup and hair are finished and we check through the clothes to make sure she is happy with our selection.
10.30 – 1.00: First shoot in casual clothes to get Libby relaxed, and get used to being photographed.
1.00-2.00: Lunch break
2.00 – 5.00: Second shoot with more dramatic make up.
Locations
Stone built garage
Stable building/barn
Wheat field
Porch
Kitchen
Hallway
Staircase
Most of the above were chosen for their light and rain cover, as it was torrential rain for most of the day.
Safety shots
I always start with safety shots – and by this I mean somewhere easy for the subject to stand/sit while I work out which way she looks best. Once she starts to realise that she doesn’t have to do anything, she starts to relax – I will direct her and move her around, until I decide which angle makes the best shot.
I need to ease her into the shoot slowly, so that by the time she does the really ‘modelly’ shots in the afternoon she is very relaxed and game for anything! At this stage she is in very natural make up, because if we do dramatic looks at the beginning it could be too much of a shock to her – I need to build her up to that gradually. I am also shooting pictures both for her, and for her parents. Most teenage girls (and boys!) want to look older, whilst their parents want her to look like their little girl! In this case, Sarah knew from experience that we were going to do both.
Garage
We started in the garage – it was a stone building with no doors, and the top shade from the roof provided perfect lighting and protection from the rain.

The sketch above shows where Libby was positioned, and how I used the reflector to bounce light into her face. Light was also being bounced from the pale concrete floor. Remember it’s a really dull, rainy day, and the light is still beautiful because of the top shade, the reflector and exposing for her face.
Tip: Always use a lens shade, they are designed to stop sunshine causing flare, but they also help to stop raindrops getting on the lens, which are very difficult to remove quickly. When you’re not shooting, carry your camera with the lens facing down to avoid raindrops too, and if you can hide it under your jacket, even better.
Stables/barn
Next we changed clothes and took some photos in a large barn with metal doors and light concrete floors. This location had doors at each end of the building providing good light and top shade when we placed Libby at the front, but also giving light to the background, when we opened the doors behind her.

These shots are all taken in the same place, but look different because I’ve altered the camera angle, or my own position, and opened and closed the doors in the background. Top right: the wind suddenly blew which made her laugh, and gave me a very natural shot. If you always have your camera set up on the same settings, you can just grab these kinds of shots easily.
I tend to shoot down on people so that their eyes look bigger – it’s much more flattering to do this. It’s easy when she crouches on the floor, but because I am not very tall, I sometimes stand on a box or a stepladder when the person is standing up, so I can keep looking down towards them.
However, in the image (second top) above, I am lying on the floor shooting up to get a totally different feel to the shot. If a person has good bone structure, as Libby does, then shooting up at them accentuates that. I also love the skylights above her which give me an extra background.
All these images are shot with a circular reflector to bounce as much soft even light in as possible, because it’s a really dark, wet day.
Tips for using a reflector
Use a reflector which has a white side and a gold side (preferably “sunfire”) – on dull days the gold side really warms up the skin tones. On sunny days it would be way too bright and you may need to put sunglasses on the model! Try this one: Lastolite Reflector Sunfire/White 95cm (38″) 3806.
Practice finding the best light – move the reflector around, side to side and up and down, until you see a patch of light suddenly hit the face – ask someone to hold it in position for you, or lean it against something (you can also get things that hold them up – but I like asking a parent or friend who is on the shoot with us, because it gets people involved, which they enjoy).
If you don’t feel confident to experiment on a real shoot, try this on your dog or garden gnome at home first!
Window light
Libby changed her clothes to eat lunch (and not get creased in the clothes we wanted for the shoot) when I spotted some lovely soft light on the way down the staircase, so we did a quick impromptu shoot!

A reflector is essential here, as without it, half her face would be in shadow. On all these images except the top left, I am sitting on the windowsill by her feet.
Model time!
After lunch, Karen enhanced Libby’s makeup to give her a much stronger look, and changed her hairstyle to create a more glamorous image. Now Libby is relaxed and really into the shoot, we are able to go out and create much more model-like pictures. If we had done this at the beginning she may have looked nervous, and we need her to be totally relaxed at this stage, in order to get the best shots. It’s all a process of working through from nervous to confident.

This shot may look as if it was taken in a studio with flash lighting – but it wasn’t! Our “studio” is the double doorway of the hall – with natural daylight and a reflector, as before. The top shade of the doorway creates the soft light, and the reflector bounces in as much light as possible.
We also dragged the hall carpet over to the doorway to give us an even background, and make it slightly more comfortable to lie on the floor!
Tip: Try this in any doorway – it doesn’t have to be this wide – it can be a single front door. If the sunlight is pouring into the doorway, use the back door at the opposite side of the house – you need the shaded side to get the most flattering soft light.

For the images above we opened both doors and Libby was lying across the doorway with her head at the right hand side (as I look at the doorway). She is in the same position for all these shots – I have asked her to move her head slightly each time, zoomed in and altered the camera angle to create variety.
The only retouching here is a little bit of softening to the skin, and brightening up the image slightly – everything else is as a result of the top shade, the correct exposure for the face and a reflector. (Except the black and white of course, which has been de-saturated too.)
Wheat field
It stopped raining for half an hour so we grabbed the opportunity to get outside and shoot some pictures in a gorgeous wheat field beside the house.
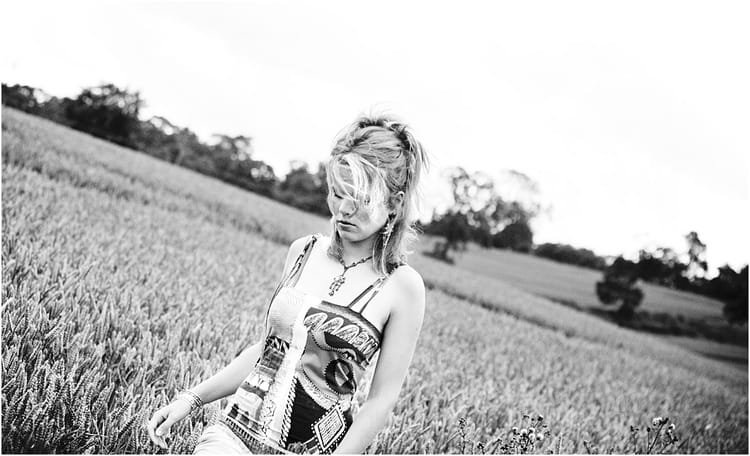
Note: This field belonged to her parents – it’s not a good idea to run wild in wheat fields without permission from the owner!

Bottom left and right: I’ve used a reflector here which makes all the difference to the light on her face in a close up shot.
Kitchen
Sarah wanted a very glamorous shot of Libby in a veiled hat, rather like the shots I did of her in 1990, so I decided to create a “studio” in the kitchen – but this studio was slightly different – see below!

Who says you need flash and softboxes? All you need is a window, a reflector and a kitchen worktop!
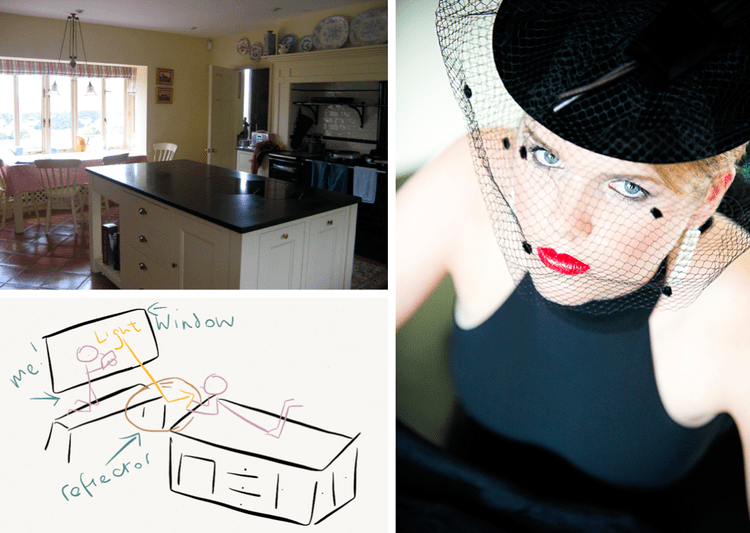
All these pictures were shot with Libby lying on the kitchen worktop with a reflector (white side) at the same height as the worktop, bouncing the light from the window behind me. They were shot at 800 ISO and I held the camera very steady! It’s important that you tell your subject there is very little light so they need to keep absolutely still. Again this may not work earlier in the shoot, because she needs to have the confidence to stay still and know she is going to look good, but at this stage she is used to doing everything I ask of her.

You can see how close the reflector is because it’s reflected in her glasses above, and if you skip back to the earlier photos you will see how much her confidence has grown by this point. Another reason to allow yourself plenty of time to do a shoot.
Without the reflector, her face would look dark and patchy – particularly as she is lying on a black granite work surface. We did switch off the electric hob beneath her just in case we set fire to her!
Note: You do not need a big kitchen to do this – these shots are tightly cropped – a doorway with reflector will work fine, or a table in a window, so long as you can have your back to the light, so it falls on the reflector and the subject.
Staircase
Next we shot on the staircase in the hall, using the natural light from the patio doors behind me – the same patio doors I showed you in an earlier shot (where you can see the staircase in the background).

Tilting your camera makes the pictures look more interesting – you can see how angled it is by the lines on the staircase behind her.
We used the reflector to bounce light which was coming from the stairs window behind her, and I held the camera very steady.
Tip: If you don’t have a steady hand you could lean the camera on the back of a chair.
When it’s quite dark like this, you need to have the ISO on 800 and make sure the shutter speed is above 1/60 to stop the image blurring. You can of course use a tripod if you want to, it’s just that I find them clumsy and prefer to hand hold, to allow me to move around quickly.
Note: The reason I can position her this far back in the room is due to the large window behind her – I can bounce the light with the reflector – without that window I would have to position her very close to the doorway, as I did earlier in the shoot. If I shot this far back in the room without a reflector it would be too dark, and therefore the shutter speed would be too low and the image would blur.
Red dress
The next look was a stunning red dress. Karen used red lipstick to match and we shot the pictures in the same place as above, only this time Libby was sitting on the floor at the bottom of the stairs looking at the stairs window. I was on the half landing shooting down towards her, with the window behind me. We dragged the carpet away to use the wooden floor as a background and make it look different from the other shots.
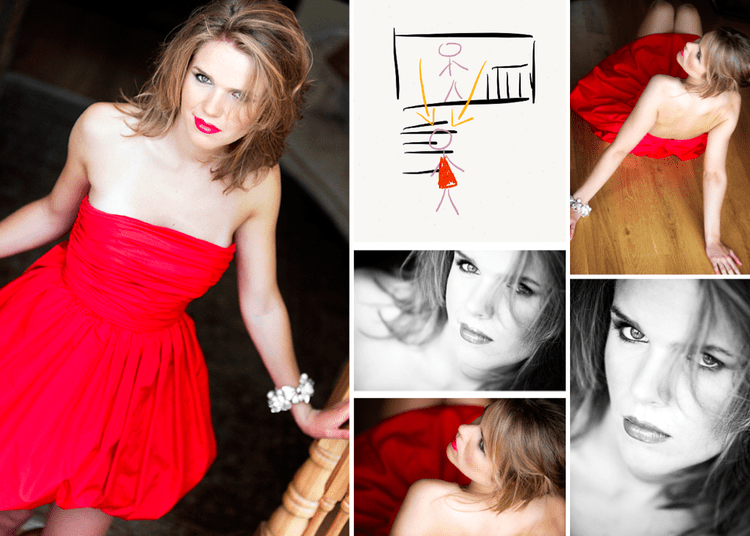
Left: The background is dark because I have closed the hall doors to deliberately place emphasis on Libby and not on the background. Close ups: I have used a reflector under her face for the very close up b/w shots above, to brighten up her eyes and make her skin glow.
Furry hat
We found a gorgeous furry hat that we thought would look great for the last few shots. Libby is in exactly the same place on the stairs as above, and we have just added the jacket over the red dress, to complete the warm wintry look.

Furry hats look great in pictures because they frame the face and emphasise the eyes. I have darkened the edges of the picture in Lightroom to emphasise the face even more.
What a fabulous shoot! I hope you enjoyed this blog, and it gives you the confidence to get out there and experiment without flash or studio lighting. It’s so much fun to work in someone’s home and make it all up together! It keeps you inspired, motivated and creative, and ensures an amazing experience for the subject, as well as yourself.
So long as you watch your shutter speed, hold your camera very steady, and use a reflector, you can work on a really dark rainy day and get some great results without any techy stuff – the proof is right here!
