Slowing Down To Get Relaxed Face Shots

I want to get the best shots I can of a person, and to me that means spending time with them, working out which way they look best.
If you keep moving them to different locations before you’ve got them to relax, you won’t get down to the real “them”.
It’s also much more relaxing for them to realise they don’t have to do anything, while you observe and work out which angle they look best from.
To illustrate this, I’ve asked 8-year-old Bethany to stay in just one place, while I show you how I can get a variety of different shots. These are very subtle changes – but all the time I am tweaking things, so I see where she looks best, and because she does not have to move or pose she does not think about it, and I can control how she looks in the pictures.
Obviously I will move on to different locations, change clothes etc. later – but this is what I do at the beginning of every shoot – spend time working out where they look best.
Slow down and look carefully at your subject – it will make a huge difference to how they look on the pictures.
Check out the video below and then read the tips.
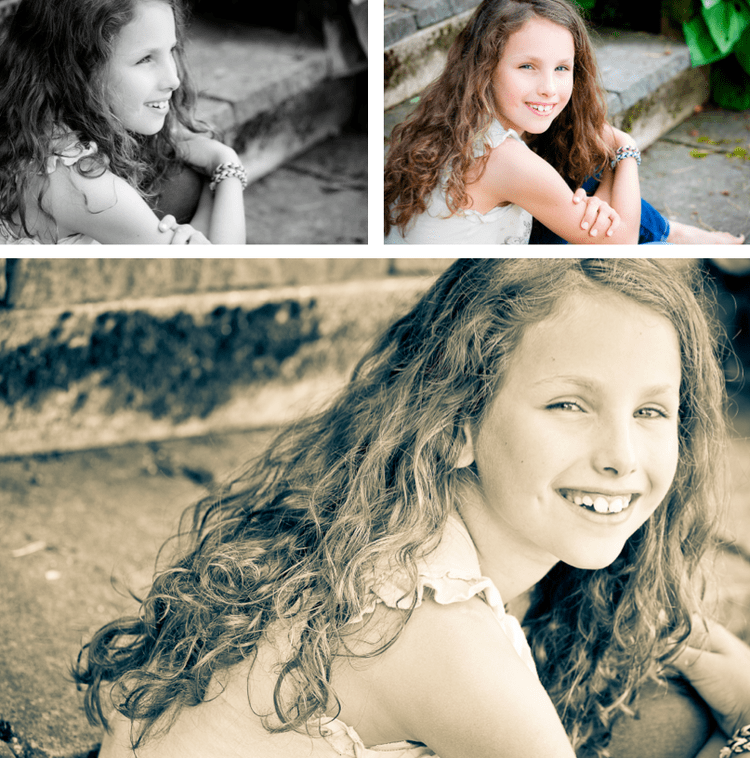
Angle 1
These pictures below look very similar, but they have subtle differences, which are achieved by changing something each time you press the shutter. Bethany has stayed in the same place – and I have either moved the camera to change the composition of the shot, or asked her to slightly move her head.

Top Left: Composed so Bethany is at the RHS. Centre Left: Now she is at the LHS. Bottom Left: Still at LHS but I have zoomed in and asked her to turn her head to the left slightly. Main Shot Right: Same as bottom left, but I have zoomed in slightly more and tilted the camera (note the slant of the steps behind her).
Note: Each picture also has a slightly different enhancement in Lightroom, to make them look even more varied.
The reason I am giving this variety is to give the subject more choice over the shots and decide how she likes herself best. With a child like this, it is not that necessary, but with an adult it would be.
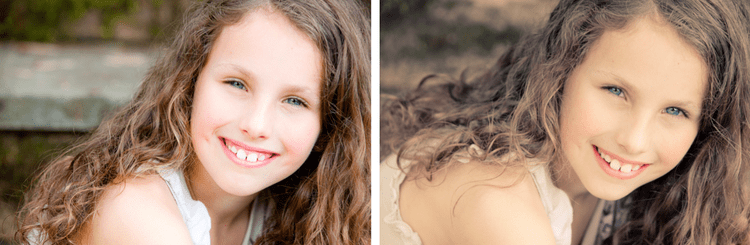
Angle 2
Below: All three pictures are taken in the same position, but there are subtle differences between each look, by tilting her head differently, or asking her to look a different way.

Left: Her body is facing to the right but her head is turned to me. Centre: Same position but I’ve asked her to look more to the side. RIght: I’ve said, “don’t move your head, but just move your eyes to me” – this is a good trick with adults as it narrows the face which adults usually prefer.
Angle 3
Next, still keeping Bethany in exactly the same place, I have walked around her to the right, to look at her from a different angle, and gain more variety.

Left: Almost full length, camera at slight angle. Centre: Same composition, but slightly zoomed in. Top Right: I’ve asked her to lean on her hand, and laugh at the floor! And I’ve zoomed in closer. Bottom Right: I’ve asked her to fold her arms, and then I’ve zoomed in and turned the camera the other way.
Angle 4
Then I keep her in the same place (and still with her arms folded), but move around to the left, and look at her from another angle.
Note: I told her to keep looking straight ahead (where she was looking at me a moment ago).
Top Left: Still looking at the space where I was a second ago! Which looks lovely from this angle. Top Right: I’ve asked her to look back at me, and recomposed by zooming out. Bottom: I’ve recomposed my camera so she is now on the RHS of the shot and zoomed in much closer.
Shoot from above
The two shots below are to show you the difference it makes if you get down to the child’s level (left) or shoot from above – I much prefer shooting from above (right).
Left: Shooting at her level makes the shot more ordinary in my opinion. Right: Shooting from above makes the shot more interesting, and also makes her eyes stand out more (in an adult this will also slim the jawline down – which usually makes people look younger).
Now I’ve asked Bethany to lean down on her knees with her head on her arms (still folded from the shot before).

Top Left: Same position, but head leaning on folded arms, and shot vertically to give variety. Bottom Left: I have changed camera to shoot horizontally, and zoomed in Top Right: Asked her to raise her head slightly Bottom Right: Asked her to look straight ahead, and cropped the shot square.
Advantages of slowing down and studying your subject
Allows both of you to relax more.
Gives you much more time to think about what you are trying to achieve.
You will notice different angles to get more variety in your shots.
The subject realises you are working things out and doesn’t feel they have to pose.
Leads to more interesting shots.
Practise slowing down and you will find a big difference to the results.
For more ideas check out these blogs:
How do you get people to relax in front of the camera?
Photographing people who don’t like being photographed
