Turning a Difficult Situation into a Successful Photo Shoot

I was recently asked to do a photo shoot for two brothers (aged 20 & 22) who were very reluctant to be photographed, but were persuaded into the shoot by their father who understandably wanted some nice photos of his kids.
He also wanted the shoot in an urban London setting to create photos that would be different from the normal “portrait” type shots he had seen before.
I used a fantastic location which you can find directly behind Waterloo Station in London – Leake Street – it’s a fantastic tunnel full of graffiti, which is open to the public to paint wherever they want. There is also a really funky, arty cafe half way down the tunnel – well worth a pit stop in there!
HURDLES TO OVERCOME:
Restrictions on where you are permitted to shoot in London (and many other major cities)
Wet weather
Reluctant subjects
1. RESTRICTIONS ON SHOOTING IN LONDON
Shooting professional photographs in the streets of London is not usually allowed without permits, and even then you are very limited. Last time I did a shoot in London, I was moved on 5 times in 3 hours! So this time I was prepared!
Please note I am not suggesting you trespass in private places – I am talking about photographing in public places in big cities. We were lucky because there were very few people in the tunnel – it was surprisingly empty most of the time and no one even noticed us!
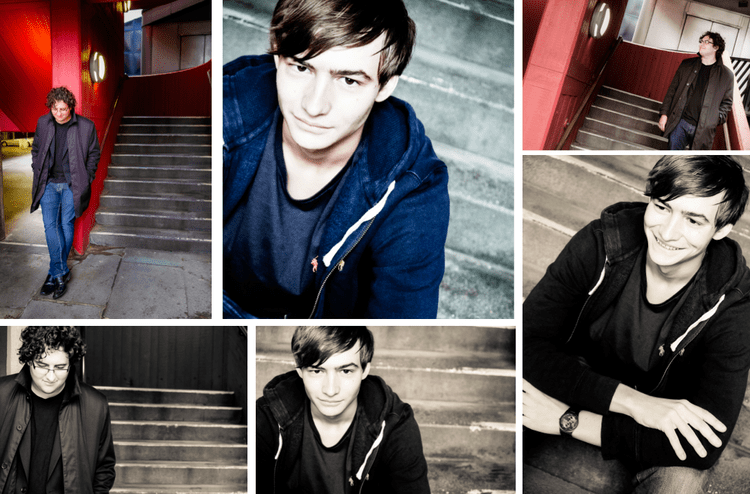
The first location was actually in the covered stairwell of the car park – a good place to start with no one around to embarrass James and Tom. It allowed them to see how much direction I was going to give so they would start to feel more comfortable.
TIPS TO APPEAR LESS CONSPICUOUS:
Don’t look like a photographer! Take a small camera and short lens which makes you look less professional. Using a big professional camera and huge zoom lens makes you stand out, and the officials will start crawling out of the woodwork very quickly if they see you shooting with that sort of equipment in a public place.
I used my Fuji XT-1 and took it in a small bright red rucksack, which looks nothing like a camera bag.Don’t use a reflector – Try to find light where you don’t need the reflector, because it will make you stand out like a sore thumb! (see: HOW TO: Find beautiful light on your doorstep)
If someone asks you what you’re doing tell them you are just taking some snaps of your friend/brother/nephew etc. because you love this wall/building/tree. Usually if you are enthusiastic about the place you are shooting in, and you’re photographing your family, then people don’t mind you taking a few shots. And if they do, then apologise and move on immediately.
To maximise your chances of getting some shots before you get caught, make sure you are ready to shoot before you position the people. Check out your background, tidy up anything that’s not going to work in the shot. Set up your camera ready so you don’t have to keep changing the dials (see Set up your camera the easy way…). Positioning them first, then messing with your camera will slow you down and decrease your chances of staying very long in that location.

If you have your camera set up ready, you can catch those natural spontaneous moments when they don’t realise they are being photographed.
2. WET WEATHER
On this particular day it was torrential rain and very cold. The persistent rain did not stop for a second throughout the entire 3-hour shoot. I had a couple of other locations planned, but ended up spending 90% of my time in the tunnel as it had so many great backgrounds and was completely under cover. It was much more important that I spend time in one place gaining the trust of the boys, and making it an enjoyable experience, than walking around to different places losing the rapport, and where escaping the rain would have become the most important issue.

NOTE: Putting your camera on an angle makes moving shots even more effective (centre). But watch the movement – you may need to use a high ISO to stop blur on a dark day.
The light in the above pictures is coming from the entrance to the tunnel. The walking shots are repeated several times, while I take lots of photos to gain a few successful ones! They are always going to be hit and miss because they are action shots and harder to control – which makes them all the more fun!

The graffiti background and the ceiling lights look fantastic when slightly out of focus on the Fuji F3.5 zoom lens (55-200mm), enhancing Tom in the foreground.
TIPS
Prepare for all weather. Take umbrellas with you to walk between locations, as wet hair does not look good when it’s unintentional. Large white umbrellas are particularly useful for shoots involving children or weddings. (See HOW TO: Shoot wet weddings with the minimum of flash)
Find places which are undercover. Overhanging roofs of stations, bus stops, archways, tunnels, etc. You may have to stand out in the rain and get wet, but at least your subjects will stay dry.
Make sure people do not get cold – take warm jackets to put on in between shots. When people get cold their noses go blue and their skin can also look less attractive – keep them warm!
Take a break! Find a cafe and drink hot chocolate! It’s surprising how you can get people going again once they are refreshed and warm.

3. RELUCTANT SUBJECTS
Many people are reluctant about being photographed, none more so than 2-year olds and teenage boys! These guys were 20 and 22, but I could tell as soon as I saw them, that they were only doing this because their Dad had persuaded them to.
The first thing I said to them was, “you don’t want to do this, do you?” to which I got a resounding, “No”. I find it’s best to break the ice immediately – so just talk about it and get it out of the way. I told them it would not be like they imagined, they would not have to do any embarrassing posing – I would direct them and tell them exactly what to do. I promised them it would be fun, even if they didn’t think so right now.
I then suggested we go for a coffee. When I’m shooting on location, I always make sure that I meet people near a cafe, so we can have a chat and relax prior to the shoot, which makes the whole thing so much easier. It is pretty impossible to get reluctant people to look good in photos if you don’t try to relax them first. Start by asking them questions – Are they at uni? What do they do there? Have they got a job? Talk to them, and find out what they do – this will help you build up a picture of their lives, they will start to communicate with you, and everything becomes much easier when you start to learn more about people. They also start to relate to you too, and hopefully realise that you are not as bad as they thought you would be! And that maybe having their photo taken won’t be as bad as they think either.
I also promised them they would be able to get their own back on their Dad and suggest ways of him having a photo too (see image below)!
Halfway through the shoot, we found an arty cafe in the tunnel, which sold cans of paint spray – we bought some, and the boys started creating pictures on the walls! This really helped to make the shoot much more fun, and had the added advantage of making the backgrounds more original!

James gets arty with the paint cans, Tom decides to paint a math equation (he’s studying physics!) and Andy (AJ) agrees to have a shot which James has adjusted the background for!
Once the boys started really enjoying themselves painting graffiti, the shoot got a whole lot easier, as you can see from their much more relaxed expressions in the next few shots.

Above: Shooting in the light at the other end of the tunnel – top shots taken on Fuji XT1 – bottom 3 taken on iPhone 5S – something I love doing, because I can give a few shots to the clients on the actual day. Once you’ve got the light and people set up for the main camera, they will also look great on an iPhone.

James looks so relaxed now after his huge painting frenzy! But actually this is not as natural as it looks – I asked him to look at the sky and laugh out loud, whilst I said, “I know it feels stupid but it looks really natural!” – which it does!
Next, I stand Andy about a metre in front of the boys, and shooting on F4 they go out of focus. I like to have the people who are out of focus looking away from the camera, so they become part of the background and place the emphasis on the person in the foreground.

Make sure the person in the background is looking away and out of focus, to emphasise the person in the foreground, and create a very effective shot.
What a fun shoot, great people and fab environment!
But it could have been a very different story without the preparation and awareness of what can happen in difficult situations such as these. If you study the tips above, hopefully you will always be able to work more effectively on a tricky photo shoot.
Good luck!
