10 Tips for Shooting “Before the Wedding” Shots in a Small Space

Many people have asked for tips on how to get shots of the bride getting ready in a “normal” house – when you don’t have a castle or spacious hotel room!
Anyone who shoots weddings will know how hard it can be to get these shots with very limited time and often very little space.
I recently photographed my goddaughter’s wedding which illustrates the problems we often have as photographers, when the bride is getting ready in her own home, and needs to be at the church by 11am.
IMPORTANT: To get all the pictures you need, YOU NEED TO PLAN! I can’t emphasise this enough. You need to work with the bride to devise a schedule so that she doesn’t feel rushed, and you can get the pictures she wants. Brides often think they will put on their dress half an hour before they leave for the church – and they usually haven’t worked out that you won’t be able to take the shots they want, because you will have already left to photograph the groom arriving at church at that time. Discussing all this, before the wedding, will make all the difference to the results.
10 Tips to Help You:
1. Use the time when the bride is having her make up done, to shoot candid pictures of the flowers, shoes, dress, etc.

2. Angle your camera and crop tight wherever you can to avoid messy backgrounds, and focus on the subject.
3. Choose a room with the most natural light available – it helps if you plan this with the bride before the day – so she knows to get dressed in the lightest room.
4. You can get great “getting ready” shots even in a very small bedroom, if you move everything you can out of the way, and choose your angles carefully (see pictures below).
5. While you are waiting for the bride, ask a bridesmaid to get ready so she can help dress the bride, which will enhance your pictures – dressing gowns/robes look great on some shots, but I find people often don’t like themselves in them when they see the pictures!

You can see in the top left picture that there is very little space in the bedroom – about 50cm around the bed, and 100cm in front of the mirror – I am standing in the window so that the light falls naturally on the bride getting dressed.
6. Ask her to get dressed so you can shoot with the natural light falling on her – so for example if she is standing in front of the window, ask her if she can move and put her dress on where the light falls on her, so you can have your back to the window. If you explain the light will be much more flattering, she will move instantly!
7. Mirrors work well, as they create space and an alternative angle (see photos above) – photograph the bride from the back while she is putting on her earrings or lipstick, for example – makes a great shot of her hairstyle too (see top centre, above).
8. The staircase is a great place to photograph the bride when the living room is full of people! And a dress with a train looks particularly good here.

Wedding dresses look great on staircases, and shooting from below makes people look tall, which they usually love.
9. It’s good if you can get shots of the bridesmaids before you leave to meet the groom and best man at the church – and this is often when you’re running out of time. While everyone is getting their flowers, you can quickly tidy up the “edges” of the room so that you can arrange the girls for a group shot. Again, stand with your back to the living room window, so the natural light falls on the subjects.
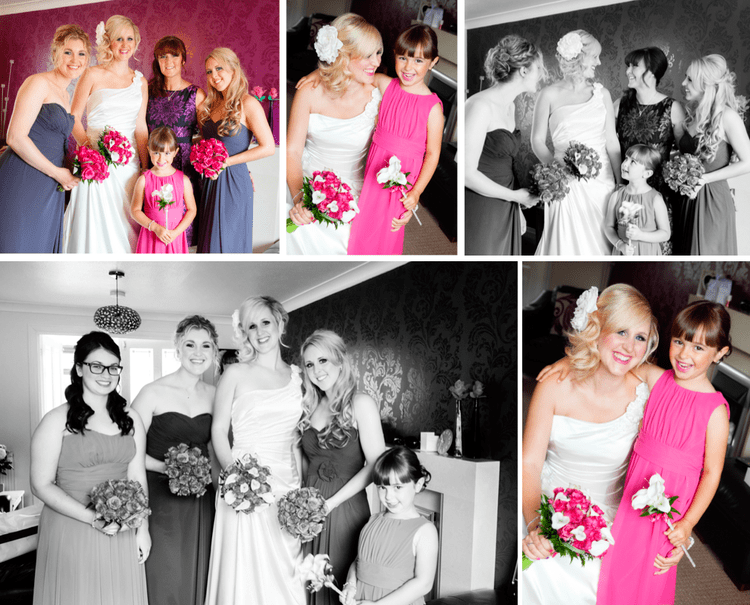
The above shots are all taken in natural light, no flash, to create soft, flattering faces. NOTE: There is a window at both ends of this room, and they are facing into the light.
10. Set up a small stool or chair so you can quickly take a shot of each bridesmaid and the bride’s mother. Hopefully you will get natural, candid shots later on in the day – but its good to make sure at this stage that you’ve definitely got a shot of each of them – as all sorts of things can happen later, and they are usually looking “perfect” at this stage!

Above, I’ve asked the bridesmaids to sit on the stool and lean on one hand, which gives a flattering body shape, also helped by the slanted camera angle.
And finally – it’s really important to get a lovely shot of the bride, while her hair and make up is perfect – in this case we literally had a few minutes, as I was really under pressure to get to the church to photograph the groom and best man, etc. Hopefully the pictures make it look as if we were all relaxed – but in reality it was a huge rush to get everyone ready in time! That’s why being organised, and planning as much as you can, really makes a difference. Of course it never goes to plan, people always think they have more time than they do – but at least if you work towards this, you will get the best results possible.
Don’t be afraid to take control (in a nice way!) – think on your feet, organise the next “set” while people are getting ready, so you’re always one step ahead.

Check out The 5-Minute “Perfect Bride” Shot which shows you more (includes video).

Make up: Lucinda Hayton
Hair: Laura Tyson and Andrea McKnight