The 3-Hour “Fabulous Bride” Shoot

Practising some fun shots with a bride in her wedding dress can really help you achieve amazing shots on a real wedding.
Most brides love to put their wedding dress on again, knowing that there is no pressure! And if you haven’t yet started doing weddings, just borrow a dress and ask a friend to model for you!
When you don’t have the pressure of the actual wedding day it’s amazing what you can achieve. It is very unlikely that a couple would let you spend 3 hours on the actual day taking them away from their guests and shooting pictures like this, but if you can persuade them to get dressed up again and do another shoot, at a later date, they will love it! And it will also give you loads of ideas for pictures you can take when you only have around 15 minutes on the actual day. Practise is never wasted!
I recently borrowed a vintage wedding dress from Star Grace who has a wonderful vintage clothing shop in Key West, to show you how to achieve the 5-minute “perfect bride” shots, and was also really inspired by a gorgeous designer wedding dress which I could really have some fun with!
Check out the fun behind the scenes video below, and then the longer “how it’s really done” video at the end of this blog.
As with every shoot I do, I checked out some locations, and then made it all up as I went along!
Locations
Fab green painted door in a street
Church with an amazing line of trees
Derelict buildings at a school bus depot
Beach in evening sunlight
Green painted door – warm up shots
I selected this location because of the colour and texture of the door, and also because it is on a quiet side street, which is important for the first few shots to get Sophie into being photographed without being embarrassed by people watching. I always spend the first half hour or so shooting my safety shots – to get the person into the shoot, and get them to start realising that they don’t have to do much – they don’t have to pose, just follow instructions, which always helps to relax them for the shots I want later, where it is essential they are really into the shoot.

This beautiful green door provided a great background. NOTE: The reflector is being used to block the sun, creating a softer light on her face, but allowing the strong sunlight to fall on her dress.
Next we bring Sophie’s husband, Trevor into the shot. I’ve deliberately let him watch for now, to give him more confidence. I often find the guys aren’t all that keen on doing these shoots, and are doing it for their partners – so it really helps to let them see that they won’t be made to pose, just to follow directions from me. (He’s dressed casually by the way, because Key West is a very laid back place, in case you’re wondering! If I’d been shooting this anywhere else, I would have used his suit, but taken off his jacket to make the shots less formal.)

Images top: Note how I have angled the camera more each time I have zoomed in closer.
Images bottom: To get good close up headshots, start with the body position – see bottom right. Then once they are positioned, I ask them to lean their heads together, to create a nice shape and feeling of intimacy. Note how they are sitting on a cloth, and not on the dress, to keep it clean!
Off to the Church
I’m not suggesting for a second you should do this outside the church on a wedding day – you’d probably get some very funny looks! I used this area because I loved the symmetry of the doors and the trees and was inspired to see what would happen if the bride was running along in front of them. As you will see from the second “behind the scenes” video later on, it took several takes to get this right. I just asked Sophie to do it over and over again, while I changed my position, and did various things to improve the shot. Sometimes you just learn what works by trial and error.

I tried all sorts of things to get these shots; we just experimented and worked it out until it felt right! Top right: The reality of the scene on a busy road!
Next we started twirling in the dress! Something I love doing with lots of layers of tuille, because you can get some really natural, spontaneous looking shots, even though they are entirely set up as you can see on the video! But I love the fact that in moving shots like these, you never know quite what you’re going to get!

Top: It’s great to get some spontaneous, natural looking shots as she gets ready to twirl – it’s important to ask her to hold the tuille at the edges, rather than close to her, to get a more effective shot.
NOTE: It’s unlikely your bride is going to run around laughing naturally and twirling her dress – you have to set this up, and then take lots of shots as it happens – that’s how they look “natural and spontaneous” even though they’re not!
I will only use a few of these shots taken when she’s moving – many will be thrown out because they will be blurred or out of focus. That’s why it’s important to keep changing your angles, zooming in and out, altering the way she runs, etc. to create variety. Just firing off lots of shots of the same thing will not produce the best results. Every time you take a picture, think about what’s happening, and see if you can change something to get a different effect.
You will see from the video that I constantly ask her to, “laugh up to the sky” and say, “big laugh now!” and, because she’s having fun, and she is confident it’s going to look good, she will do it! Particularly when I tell her, “I know it feels stupid, but it looks fabulous!” If in doubt, show her a shot on the back of the camera, so she can see what you are trying to achieve. Make sure it’s a well composed, well lit shot though, or this could backfire!
Random sunlit wall we drove past on the way!
On the way to the next location I spotted a wall of amazing sunlight! I had no idea what would happen, but I just wanted to experiment, because the light looked so unusual!

It was one of the busiest streets I’ve ever shot on – I would not have chosen it because of the traffic, but once I saw that light, I just had to try and shoot a picture, without getting run over! I am not suggesting everyone should go out and shoot in a busy street – but I’m showing you this because the light was amazing, and if you check out the second video, you will see how long it takes me to work out where the light just works on her face – and this should give you the confidence to realise that there is no right and wrong, and I don’t automatically know what things are going to look like before I shoot them (as many people think)! It’s a case of try it and experiment! If it works it will be great, if it doesn’t then no one will know! Oh, and if you’re shooting professionally, don’t be afraid to try things like this – if it doesn’t work, just tell the client it’s not working and you’re moving on to somewhere else, otherwise they will want to know where the pictures are later!
Remember, you’re working as a team on these shoots, make it a fun experience, enjoy it and make it all up together!

It’s not often you get the chance to shoot in such amazing light – this really was entirely ad lib! I was yelling instructions over the traffic and because this was 2 hours into the shoot, Sophie was used to just doing as she was told! Trevor couldn’t be in these shots because we had to leave someone with the car, on such a busy street!
Tips for tricky lighting
If you want to get the results in the first collage above – you have to expose for the face. (See how to set up your camera the easy way.) Note how the shadows go really dark when we expose for the light face (left and bottom centre), and how they go really light when we expose for the dark face (bottom right) – neither is wrong – they are just different effects, and when she’s looking directly at me, it works better to have her face in the shade, as the light is softer and she can open her eyes (bottom right).

Left: Trying to shoot with cars and bikes passing constantly! Centre and right: Video stills showing how difficult the light is, and why it’s crucial to set your camera to expose for the face, rather than on auto. (I’ve deliberately left the video stills untouched to show you what happens when it’s set on auto.)
The shots above are stills taken from the video, and show exactly what would happen if your camera was set on automatic, and you didn’t expose for certain parts of the picture – it would try and expose for everything, because it doesn’t know you want the face perfect. (Even cameras with “face recognition technology” struggle in tricky lighting!)
Derelict buildings
This was the area I wanted to use all along – everything else was practise leading up to this place! I don’t like to start in my favourite place, because if the subjects are not relaxed then the shots won’t look as good, therefore by the time we get there, I want them to be absolutely loving the experience, and feeling totally chilled with the whole shoot.

I love the washed out, faded colours of this building – they make such a fantastic background! Colour images above cropped and enhanced in Lightroom, using preset “old polar” which gives a contrasty, saturated, gritty feel to them.

One of the great things about being high up on the fire escape was the wind up there! It was blowing her dress all over the place, which really added to the effect. The shots on the left have been softened using the Lightroom Clarity slider. Right and centre – “Color Creative old polar” preset.
Don’t be afraid to experiment with composition. Move your camera so the subject is in different parts of the frame, zoom in and out, alter your angle and turn her head to create variety.

ABOVE: The sepia shots are taken while she is actually walking down the stairs, but the shot on the right I asked her to stop in mid flow – shooting a full length shot from below makes people look much taller, which usually works well in a wedding shoot, as it emphasises the dress.
At this point I was getting totally carried away, and had practically forgotten about Trevor! So we whipped his top off and then did some more “together” shots!
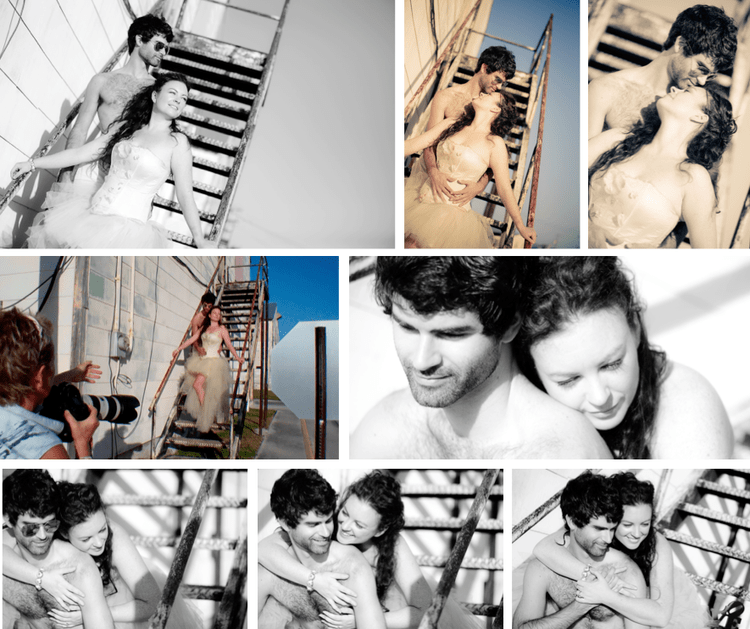
And now we’ve got Trevor’s shirt off it would be mean not to take a few shots of him on his own too!

Not the sort of shots you would normally take on a wedding day, but when you’re doing a shoot like this, you can do anything you like!
Love and dancing!
Sophie and Trevor were particularly fond of the LOVE sculpture in New York, and had bought a miniature version which they wanted to include in a picture – so we did a few shots including this, and then I asked them to dance! Dancing always makes people laugh because it feels so silly at first, but it creates very natural, fun looking shots!

The light in the pictures above is soft and flattering due to the top shade from the overhanging roof. I shot the “LOVE” pictures on the left, focusing first on the statue, and then on the couple, to create variety. I also angled the camera to make the shots more interesting. Bottom right: I asked them to stop dancing, hold each other tight, and asked Trevor to kiss Sophie’s throat – which resulted in a beautifully sensual shot.
Finally off to the beach to grab the last rays of evening sunlight…

There is nothing like the glow of sunlight at the end of the day – it’s just beautiful golden light, which makes the skin tones look incredible.
And to finish off the shoot – Sophie does ballet, which means she can jump quite high – so I thought we’d try something different!

Another great day! I hope it inspires you to do your own “Fabulous Bride” shoot! Don’t wait for a bride to come along – sort it out yourself and practise taking some amazing photos! If you do a few of these kind of shoots, you will build up a great portfolio – it doesn’t matter that they weren’t shot on the day, the experience will give you all sorts of ideas for how different dresses work. And then on a real wedding day, you can do a mini version by persuading the bride to let you have a 15-minute shoot with her!
Check out the 10 minute video below which shows you exactly how these images are created, and hopefully will give you lots of confidence to try it yourself… NOTE: if you use headphones the sound is much easier to understand!

For more wedding ideas check out:
Many thanks to:
Trevor and Sophie DeVooght for being our models.
Star Grace of Grace Boutique, Key West for loaning Sophie’s fabulous wedding dress to us.
Jeff Leap for the videos and James Robinson for the editing.
Sophie’s wedding dress created by Belinda’s Designs Haute Couture, Miami.