Amateur Photographer Summer Workshop

“How to Photograph Men” was the title of my Summer Workshop with Amateur Photographer Magazine. I was joined by Sue Kennedy and Helen Schryver, who came along to learn tips and ideas.
The weather was cloudy and overcast, and we shot the pictures in the streets around IPC Magazines in Southwark, London.
Check out the video below for a “fly on the wall” look at the day.
Our biggest challenge was being constantly removed from the areas I had chosen to shoot in! I had spent the day before checking out the locations, and found all sorts of fab backgrounds, but as often happens in big cities, not everyone thinks the same way. It’s amazing how many “health and safety” excuses can be thrown at you by “jobsworths”! But I suppose I understand that they can’t put up with it every day, and there is so much security now in London, that it’s a real problem.
I find the best way to deal with this in a big city, is not to ask permission (because they usually say no or want to charge you a fortune) – I just see how long I can shoot for before I get moved on! Then I smile sweetly, beg for a few more minutes, and eventually move on to the next location.
Everywhere outside London, I tend to ask permission, because people are usually fine about it if you ask first, particularly when I tell them how fabulous the front of their cafe is, or how great the walls are outside their shop, etc. most people get swept away by the enthusiasm and are only too glad to help.
Backgrounds
I started by showing Helen and Sue pictures of the places I had chosen the night before, so that when we sorted through the model’s clothes, they could see how I was selecting colours based on the backgrounds I was going to use. Neither of the models were professional, they were friends who had kindly agreed to model for us, although Gus had done some modelling a few years ago.

I chose various locations the night before based on their colours, shapes and texture.
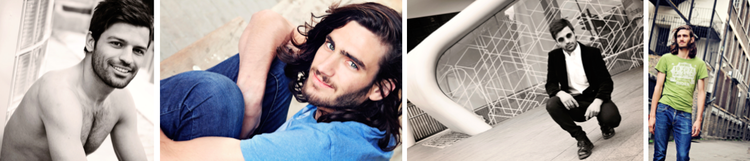
Our first model was Saroush, a furniture designer, originally from Iran, and now living in London.
We started shooting in front of a fabulous yellow building (bottom left – above), where we literally had 3 minutes before we were asked to move, because “it was dangerous to shoot outside it” – however it was fine if we stood in the middle of the road! Guess they wouldn’t get into trouble if we got run over on the council’s property!

I love tilting the camera to emphasise the shapes and lines of the background. Try composing your picture to include shapes which work together, as in the shot on the left.
Then we found an area behind the Underground station, which was more off the beaten track, with glass bricks and metal panels, providing more fantastic shapes in the background.

Simply changing a few things, like your position, or zooming in, or turning your camera the other way up – can result in a variety of different shots without having to move your model too much – so they stay relaxed and you get some great photos.
Of course we couldn’t resist asking him to take his top off! It was pretty chilly, but he obliged!

In some ways, photographing men is similar to photographing women, in that I either ask them to stand or sit so that I can see how they look best, then I tidy up their edges, so to speak! I angle their shoulders, and turn their head until I think they look right.
However, when photographing women, you need to accentuate their shape, by creating an “S”. With men this would make them look effeminate. You need more of a solid, strong stance, to accentuate their masculinity. Leaning forward on their knees as above creates quite a strong shape.
Arty building
Next I asked Saroush to put his smarter clothes on, because I thought the stronger lines would look really good against this amazing arty glass. We only had 5 minutes here before someone spotted us, but we all got some great shots.

I have positioned Saroush about 10 feet away from the background which allows it to go out of focus and soften the lines. If he had been close up to the background the lines would have fought with the subject and made the image look confusing.
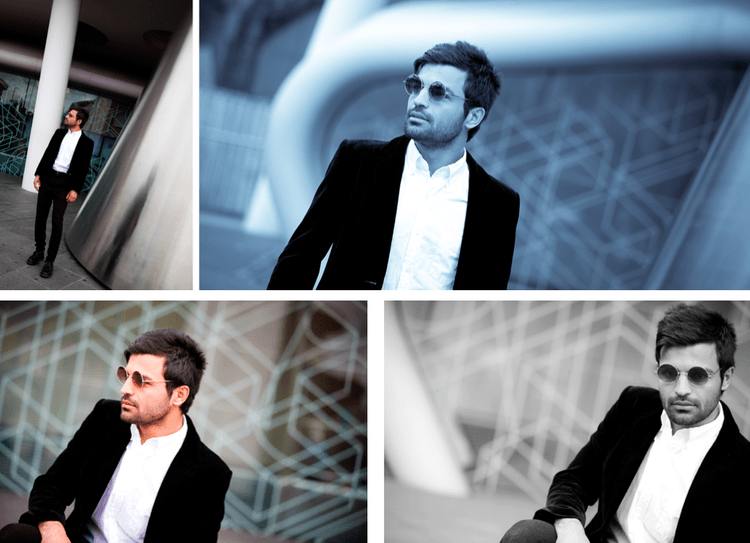
Top left: This is shot on the 24-70mm lens at F5.6 and you can see how the background is much more in focus than on the other shots, which are taken on the 70-200mm lens at F2.8.
Having been chased off most of the sites in the morning, we decided to behave and go down a quiet alley for the next shoot in the afternoon, with our Portugese model, Gus.
We found all sorts of areas with broken bricks, peeling paint, graffiti and amazing texture – we were totally spoilt for choice.

For the first few shots, I chose his bright blue faded t-shirt because it blended so well with the blue background colours (top) and contrasted with the red (bottom right). Positioning him so he leans forward on his knees accentuates his arm muscles.

Then we changed into the faded green top and found an area of top shade below a roof, which created really soft light on a very overcast day.
After this, we decided to make the pictures more animated and asked Gus to walk backwards and forwards along the alley in front of a wall of graffiti.
TIP: Always check the writing on the wall – because sometimes you just see it as shapes and colour, and then when you check later you can have some very obscene words that spoil your picture!

The colours and shapes of the graffiti on this wooden wall make a fantastic background. It takes several shots to get one that works – you have to keep trying it out, and deciding where he looks best in the composition. I’ve then cropped it to a panoramic shape which I feel makes the shot more interesting. I’ve also kept him quite a distance from the wall to add depth to the picture, and the edges of the picture have been darkened in Lightroom to make the subject stand out more.
In the shots below, I have given Gus various instructions to make each shot different.

Top left: Stand and face me, and look to your right. Top right and Bottom left: Keep walking and then look back at us over your shoulder. Bottom right: Keep walking and look straight ahead.
We then walked further down the alley to gain some distance from the high buildings behind us, so that when we are a long way away from them and they are out of focus, we get amazing shapes in the background. The further you are from the background, the more out of focus it will be, on a long zoom lens.

Left: This positioning would not be flattering for many people, but as Gus is very tall and slim, he gets away with it. The background is sharper because this is the 24-70mm lens, where the others are shot on the 70-200. Centre: Changing this shot to black and white accentuates the shapes in the background and because he is so far in front of the buildings, he really stands out, adding strength to the shot. Right: He is in exactly the same place in this shot, but the effect is nothing like as strong as in the black and white one.
iPhone
I always take my iPhone on my shoots, because I love the effects you can achieve with Hipstamatic and Camera+. And the added advantage is that you can give the pictures to the models straight away, rather than have to wait until you have sorted out all your images after the shoot. Once you’ve set up a shot in great light, with a good background, your iPhone shots will look really professional. Check out HOW TO: Shoot Great Portraits on your iPhone for more info.

Top left and Right: Hipstamatic – with one of my favourite looks – John S Lens with KodotXGrizzled film. Bottom left and Top centre: Camera + with “depth of field” and faded effect (bottom), HDR effect (top). Bottom right: Camera + with “Color Dodge” effect.
So what did Sue and Helen learn?
Sue Kennedy:

“It was great to see how you worked, check out the back of your camera, ask daft questions and then apply that learning during the shoot. The fact there were just two photographers was a wonderful surprise. So yes the confidence has been boosted, the Hipstamatic app has seen more use than ever And of course it prompted me to really get to grips with Lightroom, which I had only downloaded a couple of weeks before. Obviously it was a tough day photographing two fit blokes
I think for me, the day was about having fun with the camera, learning to go with my gut on whether a composition worked, and creating some gorgeous images. I love natural light photography and I want to do more of it and I can’t wait to show some of these images and see how people react.”
Helen Schryver:
“It was great to get some experience of working with “models” and to see you in action, in terms of building rapport, choosing outfits and directing them. So useful to take a peek at the back of your camera, and I felt inspired to experiment a bit more as a result. I have found it such an easy job editing my photos from the shoot as everything was in place to get as much right ‘in camera’ as possible. I am seeing the benefit in taking the time to find the best lighting, pose, etc. before snapping away!
Your tips on editing workflow were really helpful and have sped things up for me already. All in all a fab day! I really enjoyed meeting and chatting with you – thanks so much for a great experience.”
Would YOU like to join me on a Masterclass?
If so, please get in touch with Oliver Atwell at Amateur Photographer, via the details in the PDF below!

Video: Graham Bradshaw / Editing: James Robinson
View Amateur photographer Mens Portraiture masterclass – a PDF of the Amateur Photographer Magazine Article showing more of Helen and Sue’s images.
