Getting Started with Positioning People

Many people have asked me how I position people to get the best photos of them – so here’s my simple step by step guide to get you started.
The key is to direct people. If you ask your subjects to pose themselves and then try to photograph them without giving instruction, then it will be really difficult for them to relax and for you to get a good photo. Most people look to you for direction, as they often have no idea how to look good themselves and are usually nervous in a photo shoot. Occasionally you will find someone who looks great whatever you do – but most people do not look good randomly running around with you snapping away at them (unless they are small children). In my experience, if they are to like themselves on a photo, they usually need to be carefully arranged, from their feet to their smile! And it takes control and direction to achieve that.
There are all sorts of ways of positioning people, depending on their shape, size, features and also how many people there are in the shot, and whether they are small children or adults. The best way to start is for me to talk about positioning one person, and to give you links to many other blogs on the site which show you how to deal with all sorts of different issues.
IMPORTANT: From experience, I find it’s much more effective to keep someone in the same place for a while, and move them around within that space, to create a series of different shots. This allows you to work on finding where they look best, by moving their face/body around without them having to do a lot of work. If you create your variety by changing location for every shot, it’s much harder to get the best out of a person. See below.
Positioning People: Step by Step
1. Choose your location carefully so you have flattering soft light on your subject’s face, preferably over an area that allows you to move the subject around a space without losing the soft light.
Here I used a wonderful rusty Citroen van which luckily happened to be under the shade of a big tree – perfect! Check out this blog for how to find light: HOW TO: Find beautiful light on your doorstep.

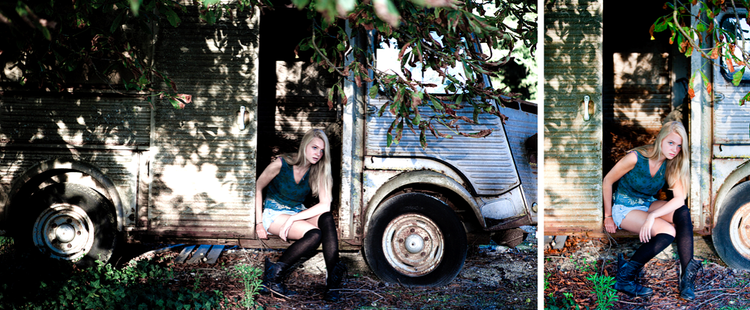
LEFT: Rusty van used as a backdrop – I was shooting from the barn side. RIGHT: Soft flattering light in the doorway of the van.
2. Ask your subject to sit in the doorway however she likes (above right).
This is a great start to effective positioning, as she will sit more naturally than if you try to pose her, and then you can tweak things from there. NOTE: How her face is positioned in the soft light, so the shadows do not cross her face (I asked her to lean towards the doorframe to achieve this). She looks nice in this shot, but I want to make her look better, as I don’t like the position of her legs (above) – so I ask her to move her legs to the side, and see what happens. And then I ask her to lean her arm across her legs. This is a case of experimenting, with slight adjustments, until you like the way she looks – see below.
I love the position of her legs here – now the shot is really working, and provides a great start from which to take a variety of shots. LEFT: Shooting wide with the whole van in shot. RIGHT: Changing the angle of the camera and cropping in closer.
IMPORTANT: Don’t be afraid to move your subject around, until you find the place she looks best – she will not think you don’t know what you’re doing, it will give her more confidence in you, because you are not firing off loads of shots, hoping for a good one – you are working to find out where she looks good.
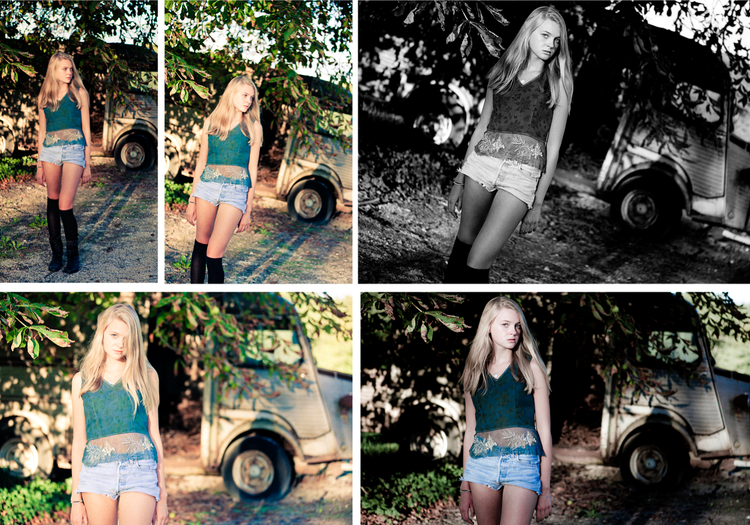
3. To create variety, I come in closer by zooming in and turning the camera vertically.

LEFT: Shooting straight on, but changing the angle of the camera. CENTRE and RIGHT: I’ve now moved my position by walking to the right and shooting at a slight angle, where the light is softer on her face (NOTE: The shadow on her face on the LEFT shot caused by the tree moving in the wind) and I’ve also zoomed in closer to get a totally different composition.
NOTE: In each shot I change something about her expression to make the pictures look slightly different.
4. Next I move around to the left to check out what she looks like from a different angle – again creating more variety.
IMPORTANT: I ask her not to move, but to stay looking where she is looking, while I move myself around to see how the shot looks from a different perspective. If you don’t tell her to stay where she is, she is likely to move her whole body and follow you and your camera – which will mean you have to start all over again with her position.

I zoom in for the first shot (LEFT) and then zoom out for the second (CENTRE) and turn the camera horizontally. Because these shots have the same expression, I altered one of them to black and white later to create more variety (RIGHT).
5. I then move back to face her straight on and crop in very tightly – as she moved her hair fell over her face – and I loved it!

6. Next I asked her to stand up, to try some different angles – and I soon realised she was too tall for the doorway!

LEFT: The shot doesn’t look great full length because she’s too tall for the doorway (though I still like it!) so by cropping in, this is less noticeable.
NOTE: The difference it can make to angle your camera. CENTRE: Camera is upright. RIGHT: Camera is tilted, creating a more interesting shot.
7. I then move slightly to the left rather than facing her straight on, then zoom in and turn the camera horizontally.
Sometimes it’s good to move around your subject and look at her from different angles – you often see a great shot that way!

8. Okay, that’s enough in the doorway!
The reason I’ve spent a while doing so many shots in there, is because its a good place to start, by letting someone sit down comfortably (well, as comfortable as you can be sitting on a rusty old metal step!) – and then getting them to realise I am doing the work for them – so they don’t need to pose. When they realise you are directing them, they relax very quickly. It also gives you chance to turn them different ways and see which way they look best – kind of practising before you go out to the next location.
Which isn’t very far in this case… we’ve now moved out of the doorway and just a few feet in front of the van – still in the soft shade of the tree.
She’s standing in the same position in all the shots, but I have asked her to move her head, look away and then look at me, whilst zooming in, changing between vertical and horizontal, and tilting the camera in different ways.
9. Don’t be afraid to try things out!
Move your camera around, move your feet, zoom in and zoom out, shoot from above, shoot from below – so long as your subject is in a flattering position to start with, then you can get all sorts of shots without altering her much at all.
TIP: Slow down! Many photographers say to me that they freak out once they’ve got the person in a situation – they snap away seeing her in front of the background but find it difficult to know how to move on from just shooting “a pretty girl in front of a van” – spend more time over your shots and think “okay, I’ve got a pretty girl and a great van, some soft light and lots of opportunities”. Really look at all the different aspects and try to get as many shots as you can from them – this will help you to focus on trying to make her look the best she can look, by subtle movements of her body, head and face. Try to see her as a shape you are moving around and the pictures will evolve as you do.
Here are a few more shots which show how I’ve altered my camera angle to create different shots of the same position.

LEFT: Taken with me standing up – note the roofline on the first two shots to see the difference. CENTRE: I am now crouching on the ground and looking up – making a much more dynamic shot (ignore books which tell you not to have lines running through people – I think they look great!) RIGHT: Zoom in and alter camera angle to create a different effect.
10. A tiny smile can make all the difference!
Ask your subject to turn her face to the side, and then, keeping her face where it is, look back at you with only her eyes (if you just say, “look at me” she will turn her head back, this is a more flattering position to make most people’s cheekbones look good and face look slimmer) – take the shot for a moody effect. Then say, “don’t change anything, just give me a tiny smile” – look closely at the shots below which show how effective such a subtle difference can be.

A tiny smile will barely alter the composition, but dramatically change the feeling of the image.
Remember, the key to getting good shots of faces is to direct people – it will help them relax, and you will get much better results. Once you’ve got these shots in the bag, you can run around and do all sorts of other things, but look at the detail when you’re shooting – not everyone looks great running around on a beach – unless they are a child or look like a model! Double chins may appear, thighs may look fat – all sorts of things which people hate about themselves might happen if you’re not positioning them carefully! Most normal people need direction – which means you need to look carefully at their features and move them around until those features look good!
And don’t use Photoshop as an excuse! Trimming down someone’s legs won’t make them look better if their face doesn’t look good, because they weren’t relaxed in the first place – directing people allows them to relax, and makes a huge difference to how they will look on a photo.
For more images from this shoot check out: French Vineyard Shoot
And more blogs for help with directing:
Also try typing “positioning” into the search box – lots of different blogs will come up.
Hope this helps
