How can I sell more framed pictures?
Q. Hi Annabel, My clients are starting to ask for prints rather than frames and I’m unsure how to combat this… do you have any ideas? – Steve Sutton, Stafford UK
A. Hi Steve, 1. Simplify your frames and make it easy for them…
Many photographers have so many frames the choice is just outfacing. And when people feel outfaced, it’s hard for them to make a decision. Having racks and racks of little frame corners is very off putting – so the client may find it much easier to just pick up the whole frame they like from Ikea! This is usually why they ask for the prints, so they can decide later. And also, because nowadays great looking frames are widely available, and reasonably priced.
But it’s hard to make a living as a photographer by just selling prints, and if you’ve spent a lot of time and effort creating beautiful pictures of people, they deserve to be expertly framed to show off your work. The best way to achieve this is to show your client something attractive that they will want to hang on their wall.
I find if you just have a simple choice of frames, white, black, wood and metal – it makes it much easier. By all means have other frames available, but don’t put them out there unless someone asks for more choice.
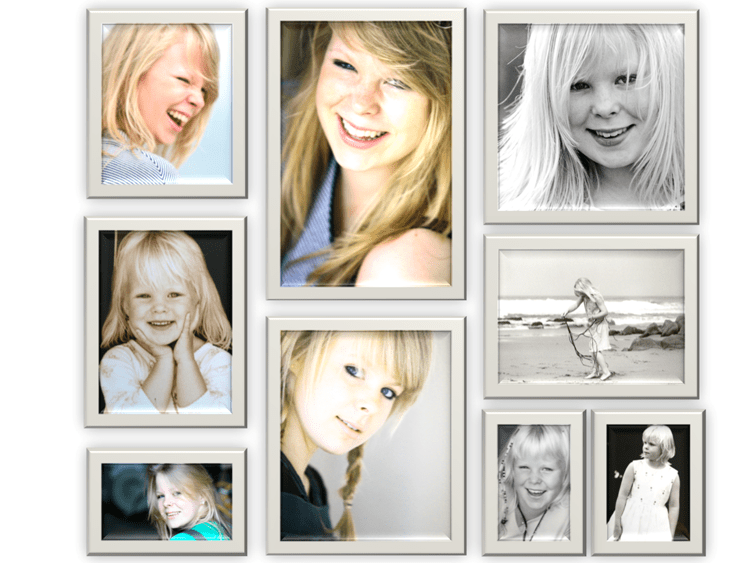
2. Display a ‘Memory Wall’ of mixed sizes – all in the same frames – they look great!
Most people would love a Memory Wall, but often don’t get round to doing it, because it can be complicated and time consuming to do. But if you offer a good price for a set of 9 frames say – all different sizes – and show them some sample layouts – it will be more attractive to them. Show them a “product” rather than a “frame”. But keep your products very simple so it’s easy to choose.
5 Tips for creating a Memory Wall
Show a simple arrangement on your wall, so the client can see the idea. Or take photos of some, if you don’t have a studio.
You can use mixed frames or the same frame, but in different sizes – I personally think the same frame works best.
Ask your client to measure the size of their wall, and tell them you will work out the best shape of frames that will fit (thereby saving them the time and effort, and making it easy for them) – they can choose the selection of pictures now, and you can size them up later to fit their wall.
Cut out different sizes of paper and play with them on the floor, until you get a shape you like (or tape them to the wall if this is your own home).
Print up the images to fit the frames.

Some great Memory Wall ideas from WWW.POTTERYBARN.COM
Check out this link and watch the video below for more ideas and great frames: Pottery Barn Style House
www.photobox.com and www.snapfish.com both print up the images and supply the frames complete.
All you need is a tape measure and some patience!
Hope this helps

Feedback
Hi Annabel, Thank you so much for taking the time to get back to me and giving me some great tips. I will be giving some of those ideas a go, starting with a cluster of frames – great idea :O). Thanks again – Steve