HOW TO: Find beautiful light on your doorstep

You don’t have to go further than your doorstep to find soft, flattering light – it works every time!
I discovered by accident that this is one of the best places to find light which is even all over the face and does not cast shadows. The reason is that the doorway has a roof over it, creating top shade, which softens the way the light falls on the face, even on a very dull day.

Top left: Alice can be quite far back in this doorway because the house is very light. I am right in the doorway here, because there are steps up to the house and I want to be on the same level as her.
Tips
Make sure the doorway does not have the sun shining into it – use a doorway at the opposite side of the house if it does, or move the person back behind the line the sun makes on the floor.
Try placing the person just inside the doorway, and then move them back a little until you see where the light looks best. Too far back and it will be too dark, too far forward and the light will be harsher – somewhere in the middle should work, depending on how much light there is coming from outside.
On a dark day use a reflector on the floor, to bounce more light in and brighten up the eyes.
Once you find the soft light, use that place as a “set” for your pictures.
Clear everything out of the background that may look like it’s growing out of their head, and compose your picture so you can’t see the actual edges of the door.
Turn off all electric lights in the hallway as they will cast shadows and make the pictures yellow – ignore white balance settings that cater for electric light, the result will not be as good as using Auto White Balance and totally natural light.
Areas which work well for top shade
The front door or porch of a house
Just inside a garage door
Inside the doorway of a barn
Under a big tree (provided it has a lot of leaf cover)
The doorway of a hotel reception, for weddings
Check out the first video on this blog which shows the difference when you move someone out of the sunlight and into a doorway: Too cool for school!
Overcast days
You don’t need to use top shade purely on sunny days either – it makes a big difference even on an overcast day – see the pictures below which were shot on a wet, cloudy day with no direct sunshine.

Top right: Soft even light from the top shade of the metal barn doorway creates a flattering picture. Top centre: Using a gold reflector helps to bounce more light into her face and gives a golden glow, which warms the skin. Bottom left and centre: Same flattering light, but “aged” using Lightroom.
On days when there is no bright sun, there are more places to find soft light outside, because you don’t have to hide from the sun. However, using a doorway will even the light out on the face, and give you a better result than standing outside.
If you want to shoot in the middle of a field however, where there is often no top shade, then find the best light by asking your subject to stand facing you, and look at the light on their face. Then ask them to turn the other way, while you walk round to the other side and look at the light on their face that way – you should see that it will look darker one way than the other – choose the lighter side. Sounds obvious, but sometimes on an overcast day, it’s hard to tell where the light will be the most flattering unless you physically try it.
Check out the video on this blog: Work it Girl! which shows you how to do this (skip to 1.16 for the relevant part).
Top shade from a tree on a sunny day
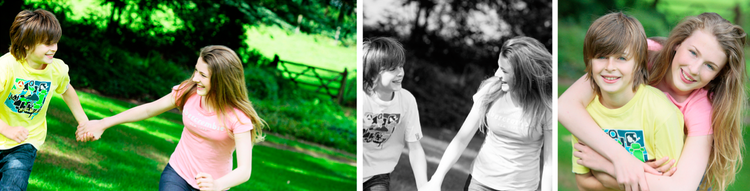
In the pictures above the sunlight is coming through the shade of the large tree above. When they are running, sometimes the light hits their faces (centre) which is fine when they are not looking at me, but it’s much more flattering when they are in the shade (left). When they are looking directly at the camera, it works best to place them under the tree, out of the sunlight patches (right), or wait until the sun goes behind a cloud.
Using top shade to create a “set”
The shots below show how if you place your subject in an area which provides good top shade, then you can use it as a “set”. You don’t have to shoot a picture which looks like “a girl standing in a stable” – you can use this place to give you a variety of portrait shots which are beautifully lit with soft, flattering light.
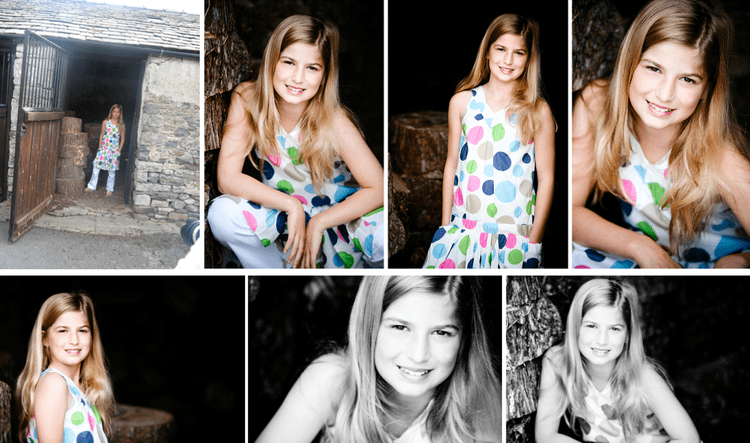
Use the doorway to create a “set” for your portrait pictures.
There was no bright sunlight on this day, it was very grey and overcast as you can see on the “before” shot, top left.
Note when you place the subject close to the doorway in a room with no other light, the background will go very dark, which is very useful if you are in a garage with lots of clutter in the background, because you can’t see it!
Top shade using patio doors
Patio doors are wonderful places to create a “set” because they are so much wider, so you have more space to work, or add more people, if necessary.

For the images above we moved all the furniture out of the background and used the conservatory as a “set”, using the space and light from the open patio doors. (Note this conservatory has a solid roof, rather than glass which would not give top shade). I was standing on a small wall in the garden, so that I could shoot downwards and use the floor as a background. It was a dry day, and I could have shot anywhere outside, however the light is softer in the doorway, and it’s important to use the best lighting you can when shooting close ups.
Sometimes the furniture in the background helps you to create your “set”, as in the pictures below. The family looks relaxed and comfortable because they are in their own surroundings, and using the natural light from the patio doors allows you to shoot a series of flattering pictures. If the room had been darker – without the windows on the right, I would have brought the sofa forward to the patio doors.

IMPORTANT: If you are positioning your subjects this far back into the room you need to hold your camera very steady and check the shutter speed does not go too low. In the pictures above, Bethany kept jumping off the top of the sofa (see bottom right) which caused a slight blur, which doesn’t matter too much in a shot like this. However you need to ask the family to keep very still for the more composed shots, and be aware of your shutter speed on a dull day. Use a tripod, or rest your camera on the back of a chair if your shutter speed is below 125, and put the ISO up to 800 or 1600. (Note the shot of the room was taken on a different day to the shoot itself – there was no bright sunlight on the actual shoot).
Exposure
If you prefer a slightly more washed out look to your faces, as I do, it’s easier to up the exposure slightly in Lightroom later, rather than overexpose the actual shot when you take it. Simply because keeping it at the correct exposure will give me all the detail I need in most areas of the picture, and I don’t want to break the rapport with the client by diverting my attention to the camera.

Left: Original image in Lightroom, which is fine as it is, but I prefer a brighter, more washed out look to my pictures. Right: I have moved the exposure slider very slightly to achieve this look (+0.65 – see sliders on right). The reason it is so easy to do this is entirely down to the fact she is sitting in soft, even light, and I have exposed for her face.
All the pictures below are shot in the front doorway or patio doorway of a house, with the exception of bottom right, which is under the awning of a gypsy caravan.

Tip: In group shots, ask everyone to cuddle in close to get their head’s together, so that at F5.6 they will all be in focus, but the background will be soft and out of focus. Look carefully at the group shots above to see how this works. F4 or F2.8 is likely to result in out of focus faces if there is more than one person in the shot. F8 or higher will result in the background being too sharp and not give the effect you see above.
Soft, flattering light can be found on your front doorstep, whatever the weather – use it to create your sets and get the most beautiful light for your photos of people. It’s a great place to start before you venture further out on your photo shoot!

Behind the scenes shots: Cathy O’Malley and Polly Williams