iPhone Photo Shoot

Dare to leave your DSLR at home and try a whole photo shoot on your iPhone?
I just tried this, and it was a lot of fun – however I also discovered a few things you need to look out for when using your phone for a “proper” full shoot, rather than just occasional snap shots on Instagram, etc.
Here are lots of tips to help you with the pros and cons!
PHONE used: iPhone 5S (UPDATE: this was written a few years ago, but all info is still relevant for any iphone!)
LOCATION: Bat House on Florida Keys
CONDITIONS: Very hot with bright sunshine
It was extremely liberating going on a shoot with just my phone, and no other gear – no decisions to make about which lens to use, and no heavy cameras to drag around.
However it was extremely frustrating at times too!
I’ve often added a few iPhone shots to my “proper camera” shoots. But this time I decided to leave the DSLR cameras at home and force myself to shoot only with the iPhone 5s.
PROS
Easy to carry – nothing like as bulky and heavy as DSLR equipment obviously!
Great range of instant effects – no need to Photoshop or Lightroom later (GODSEND!).
Quality of photographs is excellent even in poor light.
Panoramic option is fantastic!
Burst option means you have a much better chance of getting a great action shot.
CONS
Really need to watch distortion from the wide-angle lens – way too distorted at close range.
Zooming in still needs sorting on these phones – the quality of the image is dramatically reduced. Walk in closer instead.
Not as easy to see a person’s expression and feeling in their eyes, when you have no viewfinder – so a lot of guesswork – have to learn to shoot differently!
Check out the video below for a behind the scenes look at the shoot, then check out the tips to help you get the most out of shooting a portrait on your phone.
I started by shooting pictures with the camera in normal mode – i.e. no effects, just straight colour.

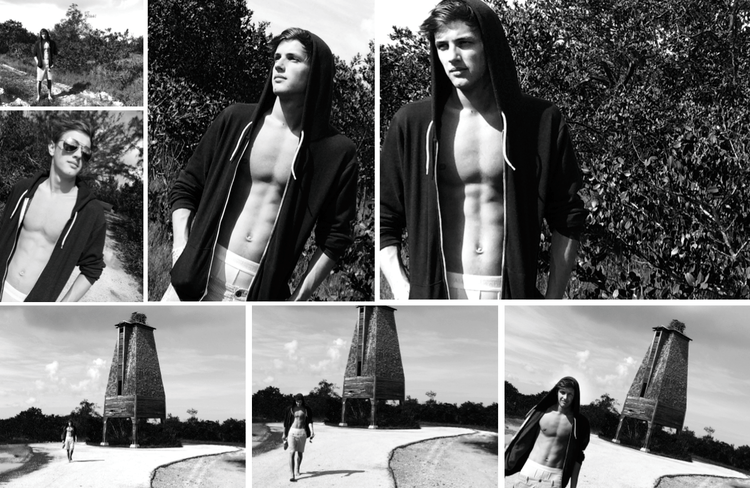
Check out the funky bat house! Apparently hundreds of bats were brought in to live here in the Florida Keys, with the intention that they would eat all the mosquitos – unfortunately the bats had different ideas, and flew off the very next day – guess they expected a pool and a BBQ!
PHOTO, SQUARE & PANORAMIC OPTIONS
There are 3 options for different shaped photos, which can quickly be achieved by sliding your finger up or down the words (see photos below). NOTE: It can be really easy to change these without knowing it! I often find myself on video instead of photo – but it gets easier with practice.

Simply slide between photo, square and pano to alter the shape of the image.
PANO
The panoramic option creates amazing photos – try it, you’ll be hooked!

TIP: Try fun things like including someone twice in a shot, see below (children will love doing this!)

To do the above:
Start by placing the subject to the left hand side of the shot.
Ask them to keep totally still.
Follow the arrow across the picture, whilst turning your body to the right, and as soon as you see your person go out of shot, shout “NOW!” and they run around the back of you into the second position. If you move your camera slowly and steadily they will be there before you are, and will then be included in the shot.
Takes a bit of practice!

Panoramic shots can be extremely effective – try the tips above to get better results.
DIFFERENT COLOUR EFFECTS
One of my favourite things on the phone is being able to put the effect on the shot instantly, without having to sort it in Photoshop or Lightroom. You can shoot the pictures in normal colour mode and put the effects on afterwards – or shoot them with the effects already on (which is what I did on this shoot).

The different effects can really enhance your image without having to use Photoshop or Lightroom.
HOW TO USE EFFECTS
Press the icon at the top right of the screen (when your shutter button is on the right) – it looks like 3 circles overlapping, and it will then show you the various options. Just press any of these and the camera will stay in that mode until you change it. NOTE: If you switch between SQUARE, PHOTO and PANO it will use whichever effect you last used on those options (i.e. just because you are in black and white on PHOTO, it will not stay there if you switch to SQUARE).
To put the camera back to normal – press NONE in the centre of the screen (shown above).

All images above shot with camera’s own effects – not cropped or retouched later. LEFT: Using PANO setting but for a shorter time, for a less elongated effect. Check out the difference PANO makes, by comparing to top right, which is shot in the same place/position but using PHOTO.
BLACK & WHITE
The black & white effects are great! Really punchy or soft, depending on which one you use.
The strong contrast effect of noir (above) works well with young people who look like models (chiselled jaws and strong features). I would use tonal for others as it is softer. Particularly good for shots of women (provided you are in soft light!).
EXPERIMENT!
It’s good fun trying out lots of different shapes and effects. The iPhone 5 camera copes really well with all sorts of different lighting situations too.

PROBLEMS TO LOOK OUT FOR
1. Distortion
One thing you need to be really careful of is distortion. It’s hard to get great quality from the image when you zoom in – it is much more pixellated. But if you walk in too close to your subject you will distort the image too. Just got to experiment until you find the balance.

Watch for distortion: LEFT looks fine because I am far away, once I start coming in closer (CENTRE) he starts to look distorted (face looks too big for body) and RIGHT is way too distorted to me.
2. Eye position
The next issue is eyes. Because there is no obvious big lens to look into – when I said, “look at me” his eyes were not looking at the lens. I had to say, “look at the lens” to get his eyes looking at me – which feels weird, because when I’m taking the shot on a DSLR I’m used to looking straight into someone’s eyes – which doesn’t happen on an iPhone, because the lens is right on the edge of the phone. Takes some getting used to! And it’s difficult to get the perfect expression when someone is not looking directly at you (hence my earlier comment on guesswork!).
NOTE: These pictures are not meant to be great shots! They are showing you the problems that can arise using an iPhone, when you’re used to using a DSLR.

It’s very strange shooting really close up – they seem to be looking at you – but on the picture they appear to be looking to the side – you have to ask them to look at the lens. (I have not mixed up the shots above – honest!).
BURST!
What a great feature this is! It is particularly good for action shots, a kid jumping into a swimming pool for example, or running towards you. Simply hold your finger on the shutter button and it keeps shooting until you take it off. Be warned it takes tons of shots though which take a while to sort through later! Most of them won’t look great but it’s a good way to get one good shot when you can’t be totally sure when to press the shutter.
If you ask someone to walk towards you whilst you keep your finger on the shutter – sometimes you’ll get a great shot which wouldn’t have happened if you’d tried to pose them – the movement makes the shot – see the last one below.

Burst mode means you can take lots of shots at once and then pick your favourite. My favourite of these is the last one!
CONCLUSION
I love shooting with my phone, however it’s not a DSLR. My conclusion is that they are great for shooting pictures which involve mainly composition – because it’s easy to see where things are placed in the frame. However, it’s not easy to get the precise moment or expression needed when shooting portraits – due to not having a viewfinder. It can be very hard to see the person’s face when the sun is shining on the screen – in fact, its impossible at times! I found myself constantly looking over the top of the phone to check the person and then taking the photo (by which time you can have missed the moment).
If you have a perfect model type person, then it’s pretty easy to get great shots. And for landscapes and inanimate objects it’s great too. However if you are a portrait photographer, who wants to get the best pictures you can of someone who does not look like a model, or perhaps young kids for instance, then I feel I need the control that the DSLR gives me.
But don’t let that stop you! You can still get fantastic shots using your phone. If you’re doing photography for fun then this is definitely a great camera to work with! And for professionals – adding iPhone shots into your shoot really adds excitement and variety, and also allows you to send the client some shots before they see the “real” pictures.

4 square shots on Hipstamatic, girl in white dress on Camera+ and girl in blue dress using iPhone’s own effects.
I LOVE SHOOTING WITH AN iPHONE – it’s great fun!
Many thanks to Chris for being my guinea pig!
For more ideas on shooting portraits with your iPhone check out: HOW TO: Shoot Great Portraits on your iPhone

Video: Jeff Leap / Editing: James Robinson
PS: IMPORTANT INFO:
One thing I discovered when transferring the pictures from my iPhone to my laptop was that the effects didn’t transfer. All I got was the original colour shots without the effect on them.
After spending several hours on the phone to a very helpful guy at apple support, I discovered Mac Users need to have the latest version of iPhoto – otherwise it can’t read the effects on the files and they won’t be transferred across (at time of writing).
If you use Photostream then it’s fine but if you use iPhoto, as I do, then you need to have the latest version.
PC users can only transfer them via iCloud Photostream
UPDATE: this blog was written a while ago and new phones are coming out all the time - so there will be constant new features to experiment with!