Palm Trees, Pallets and a Pick-up Truck!
Check out what happened when I took Jamie & Jess to Stock Island on an overcast day in the Florida Keys.
Shooting when it’s overcast means you don’t have to worry about squinting in the sun, and it creates lovely soft light, which is very flattering for faces.
Check out the video below and then read on for lots of tips on how to photograph couples.
As with most couples, Jamie & Jess were pretty nervous about the shoot. They had no idea what to expect and the first job was to relax them by getting them involved in choosing which clothes to wear. I rifled through their closets and we packed up a couple of bags and drove up to Stock Island, near Key West.
The thing most couples fear is being embarrassed by not knowing how to pose, and worrying they will be made to look silly, particularly the guys – I find they don’t really want to be asked to gaze into their girlfriend’s eyes and look romantic. Many people say to me, “I don’t want to do those cheesy shots my friends have got, staring at each other and looking soppy,” and I totally understand what they mean. There are ways of bringing out the romantic side, and the loving relationship between a couple. And that’s what I’m going to show you in this blog. If you do things in a fun way, they will relax and look at each other spontaneously, and you can grab those romantic moments when they occur naturally.
So, the first thing I do is the exact opposite! I get them to stand in a very “unromantic” way. I position them as two shapes, which work together with the background (see below). At this point, they are nervous and feeling slightly vulnerable because I’ve placed them in the middle of a housing area – with passing cars, and people!
This is why it’s important to give them clear instructions, and not expect them to “pose”. I am just making this up as I go along, and I tell them this – I move them around until I think they look good, basically! And all the time, they are starting to relax because I have taken the pressure off them – I am telling them what to do, and they just have to follow!

Centre Top: The amazing texture and shape of this trailer created a fab background, with the palms adding depth and interest. Centre & Bottom Right: Zooming in with the 70-200 lens creates variety in the shots. Main picture & Top Right: Altering your camera angle by shooting from the ground, can make a dramatic difference – I much prefer the main picture where their heads are above the trailer in the background.
Piggyback
Next we try a piggyback! This often makes people relax and laugh, because they usually find it genuinely funny.

Left: They are standing still. Centre: Now they’re spinning round & I am snapping away as they laugh. Right: Zooming in closer for a different effect.
Note: I tend to shoot these wider so I can crop in later, because they are moving and I am not sure where they will end up! It also means their faces are more in the same plane at 5.6 and helps to keep them both in focus – whereas if I zoomed right in close, one of them might be behind the other and out of focus.
Different Focus
We then try placing the emphasis on one of them, rather than both, by keeping one person in and one out of focus, deliberately.

I place them standing so Jess is behind Jamie, and take a full, in focus, shot first. Then whoever I decide to focus on, I ask them to look at me, and the other one to look away. I find it works best if the person looking at you is in focus.
Individuals
I usually start with them both together to give each other support – then once they’ve started to relax, I can do individual photos without them feeling as embarrassed as they would if I asked them to do this at the beginning.
I take Jess closer to the trailer, to show the colours and texture in the background, and I love the line of the fence.

Many textbooks tell you not to have lines crossing through people’s heads – I completely ignore this – I love it!

The colour of his t-shirt works really well with the background, particularly in the close up shot (right).

Top Left: Ask them to touch noses, rather than look into each other’s eyes – it usually results in a more natural expression, because they tend to burst out laughing.
Fisherman’s Yard
Next we drive to an area full of lobster pots and working fisherman, who are slightly amused to see us doing a photo shoot while they work. The backgrounds were full of colours and texture – fabulous!

It’s an overcast day, but placing Jess under the top shade of the palm tree softens the light and makes it more even. Note how the colours in her top work so well with the colours around her – the green of the palm and the yellow paint on the tree trunk.

I love the line of painted palm trees in the background (left). Centre & Right: Zooming in, changing angles and cropping, creates variety in the shots. So long as you move something each time, such as angle of his head, expression, etc. you can get a variety of shots without changing the subject’s body position – which makes it much easier and more relaxing for him.
Placing Jess & Jamie several feet from the fishing nets and painted pallets results in the background going well out of focus at F2.8 (on the 70-200mm lens).

The colours look great in these shots, particularly as her coral shorts work so well with the painted areas. However, the pictures work just as well in sepia (Lightroom: split tone), emphasising the shapes and texture in the background.
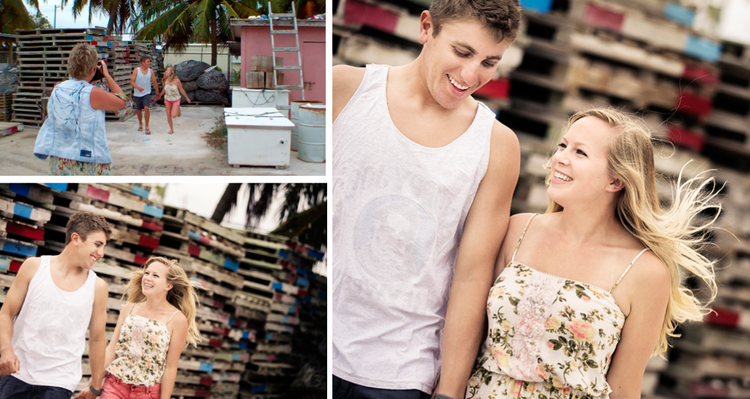
Back to running! I enjoy doing this, because you never quite know what you’ll get! The square shot (above right) is taken literally just before they run right into me! Every now and again you get a great shot doing this. I have only cropped the sides of this picture – the top and bottom are the original crop. The way to do this is to give them clear instructions: “Run towards me, but don’t look at me – laugh at each other” – and then keep repeating it and taking different shots, at different angles. Some will be blurred and some will be out of focus – but if you do it several times you should get some really good shots. Keep focussing on one of their faces, firing off shots and let it just happen!
You can of course set your camera to fire off quick shots automatically – but I don’t like changing the settings, as I always forget to put them back – so have learnt to do it manually – just do whatever feels best to you – but practise helps!

Above, I’ve used a trick I often do to create a “windswept” look. The wind actually did blow at times which helped – but if you rely on the wind you often don’t get as good a result as placing the hair yourself. In the shots at the top (above) I have carefully placed several pieces of hair over her face, creating a look I find most people love.
Tip: Shooting down towards her makes her eyes look bigger, and softens out the rest of the picture as it falls away from the lens (70-200 at F2.8).
Chuck’s Truck!
My neighbour Chuck keeps changing his cars, which is very useful for me! Last year I did a shoot in his gorgeous VW beetle (check out the link at the bottom of this blog).
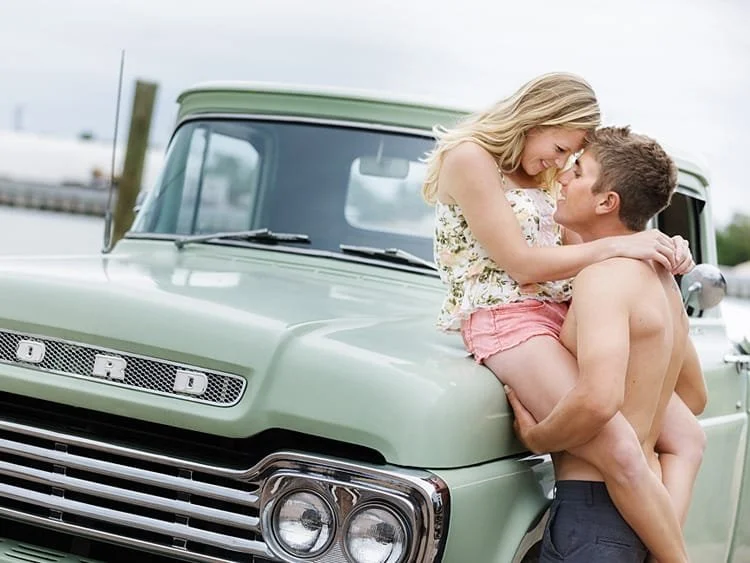
And this year, he very kindly provided a wonderful 1959 Ford F100 Custom Cab for us to play with! Unfortunately he needed it for work that day, so we grabbed an hour when he had it parked outside his workshop – luckily this was in an old marina, so the background was great!

Chuck’s amazing truck makes the most fantastic prop! Top Left: I demonstrate how I want Jamie to sit. Top Centre: Jeff holds the reflector (whilst videoing!) because we need to bounce more light into the truck, as the overcast day has suddenly become dark and stormy. We used the gold side of the reflector to warm up the light (see bottom left).
Tip: If you’re not sure where to place your subjects – start with the tallest “shape” – which in this case is Jamie. Then add the other person to that “shape”. I tried sitting Jess between Jamie’s legs on the seat, but it didn’t work, so I then tried her on the step, and I moved her around until I felt the shapes worked together – it’s a case of experimenting until you find something that looks good.

Left: I love her profile complementing his face looking directly at the camera, and the positioning of her arms draws your eye to their faces touching together.
To get a totally natural laugh – I say: “Don’t move anything, just turn your faces and laugh at me,” – and it just works!
Note: The second shot happens as a result of the first. It wouldn’t be the same if I just moved them there and tried to get them to laugh at me – I set up the first shot, and then the second one follows.
Then it’s time to do some individual shots again…

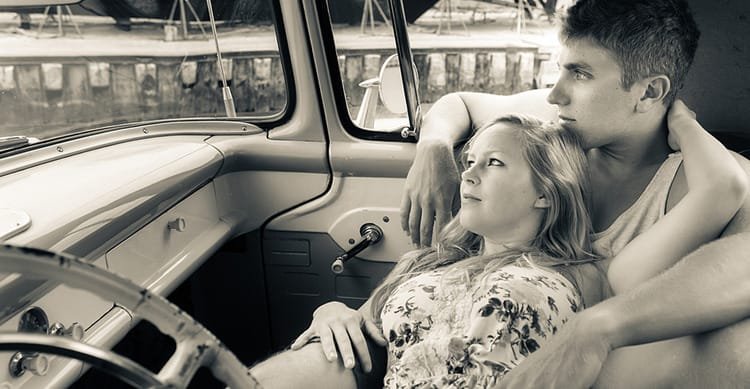
Each of the above images has been enhanced in Lightroom, using standard presets – which you can see by the colour of the car (top right is the original colour). Top Left is using Old Polar, which works really well on certain images (it can look awful on others – test it and see!). Bottom Left: Bleach bypass and Bottom Right: Aged.

The above positions are the result of experimenting. I have no idea how each individual is going to look until I position them and move them around. I started by asking her to sit on the seat (top left) and then asked her to lie down – first I positioned her with her back to the wheel, but didn’t like the shot, so asked her to swop over, and this suddenly made a much better shape with the curves of the car. I then asked her to move her body, then arms, then her face – adjusting little bits until I was happy with the shape that was created.
Tip: Don’t be afraid to try lots of different things – don’t worry that the subject will think you don’t know what you’re doing – she will be thrilled when you get that Eureka moment! You’re working this out together – and when you get the results it’s really worth it! All this experimenting together takes the pressure off her to pose for you – it makes her relax more, and realise that you are really working out how she will look her best – and that’s all any girl wants in a photo shoot!
I loved the way Jess looked when she was lying down like this – suddenly we’d moved from a nervous girl at the beginning of the shoot, to a really sensual looking model! So I decided to bring Jamie back in and see what I could create…

Top Left: I bring Jamie into the background of the shot. Right: Then I decide to change the look, and it takes me a while to work out the shot, by changing angles, zooming in and making slight adjustments to their positions until I’m happy with each shot.
One of my favourite shots! (Lightroom “split tone”)
Check out the Opposite View!
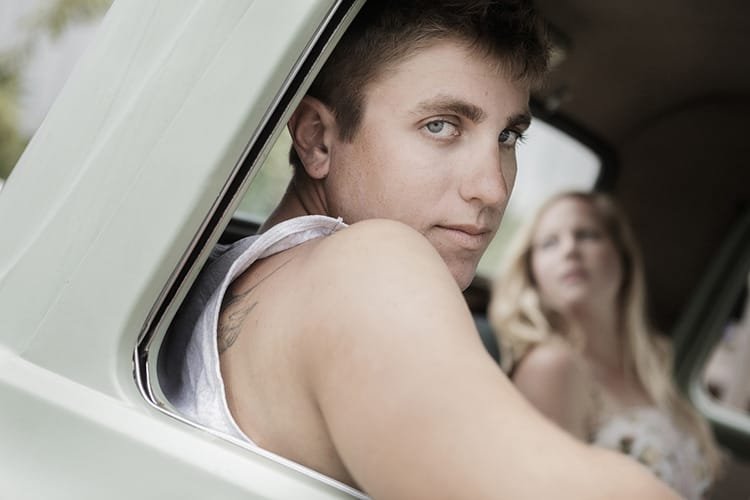
Next I decided to look at this from a totally different angle – the other side of the truck. I asked them to stay in that position, and walked round there to see what they looked like – I suddenly got inspired all over again, when I saw the shape of Jamie’s face and arm from the opposite side. He was providing a “frame” for Jess, which looked fantastic.

I loved the shape of Jamie’s profile and arm from the other side of the truck – and used the shape to frame the picture by moving Jess into a more prominent position, turning her face to use the light from the rear window, and keeping the focus on her.
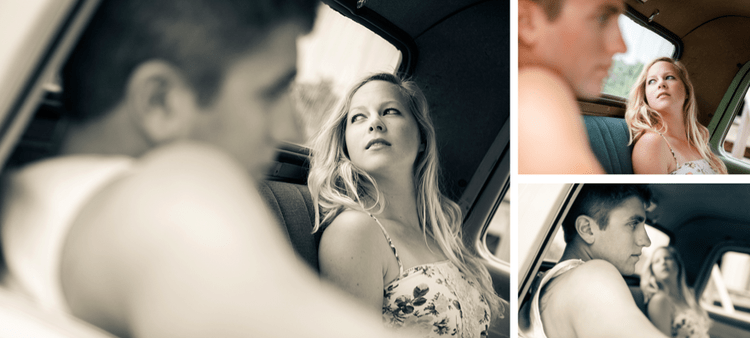
Next I experimented by cropping differently (top right) and then bringing Jamie into focus instead of Jess (bottom right).
Wow – what a gorgeous look!
Finally we took a few shots of them outside the car, as I always like to end a shoot with pictures which show fun and happiness – I am always thinking of how the pictures will look in a storybook album, and I like to finish off the story with a smile! A kind of, “didn’t we have a great day?” sort of feeling!

Hope this gives you some great ideas for photographing couples – try this on a pre-wedding shoot – you’ll give your bride & groom a huge amount of confidence, and prepare them for their big day!

Many thanks to Chuck for the loan of his wonderful truck and Jess and Jamie for being such fantastic models.
Video: Jeff Leap / Editing: James Robinson
Check out “Teens to Twenties” to see Chuck’s beautiful vintage VW car.
For more tips and ideas for shooting couples – check out:
Valentines day is here again!
The 3-Hour “Fabulous Bride” Shoot