HOW TO: Position women to get photos they’ll love – Part 1
I love photographing women! I love to prove that they CAN look great in a photo, provided they are photographed in flattering light, and with good direction. You need to take away all the hard work – and do it for them!
I’m sure most women reading this will say they hate having photos taken of themselves. And I’m sure most men reading this will have been frustrated at times when they’ve taken what they think is a great shot of their wife/girlfriend/daughter, only to be told they don’t like it.
This is all quite normal! I have photographed thousands of women throughout my career, and most of them have issues about being photographed! It doesn’t matter if they are a stunningly beautiful model, or a perfectly normal everyday girl; they are self conscious and worried about what they will look like.
It’s not actually the photo shoot they are afraid of – it’s the results! We’ve all seen ourselves looking unflattering on a holiday snap, and many people believe they are just un-photogenic. I have never met anyone who I couldn’t get a good photo of – it’s not them – it’s the way they’ve been photographed in the past.
So, it’s essential with any shoot to start in the right frame of mind. She is likely to be nervous at first, and it will take a while to start having fun – but if you can take someone through the process I am going to show you, hopefully you’ll take pictures she loves!
You need to give constant direction and take control at the beginning of the shoot, to build up trust and work together to create the pictures.
So how do you do it? It’s easier than you think.
It’s not a case of standing someone in front of you and hoping they look good. You have to MAKE them look good! Even the most gorgeous model can look bad in a picture if she is wrongly positioned. Honestly!
I know many photographers worry because they start by getting their camera out, looking at the person, and then thinking, “Help what do I do?”
Well, if you break things down into sections, as I show you on the videos below – you will look at things in a completely differently way.
Remember, that they don’t know what to do either, and are waiting for your direction. Once you have some basic positions, you will be able to direct them, and achieve the pictures you want.
It’s all part of a process.
Take a look at this first video which shows you exactly how I work – I’ve broken the shoot down into sections, so you can learn how to create different positions which can be the basis of your shots. I have deliberately left in lots of instructions so you can see exactly how I work, because the way I talk to and direct people is essential for getting good results.
POSITION 1 – Sitting on a chair or stool
Find out how to find the best light for faces, and how a few simple tips can help you create flattering pictures in this 10-minute video.
NOTE – You will get the most from these videos if you watch them in order.
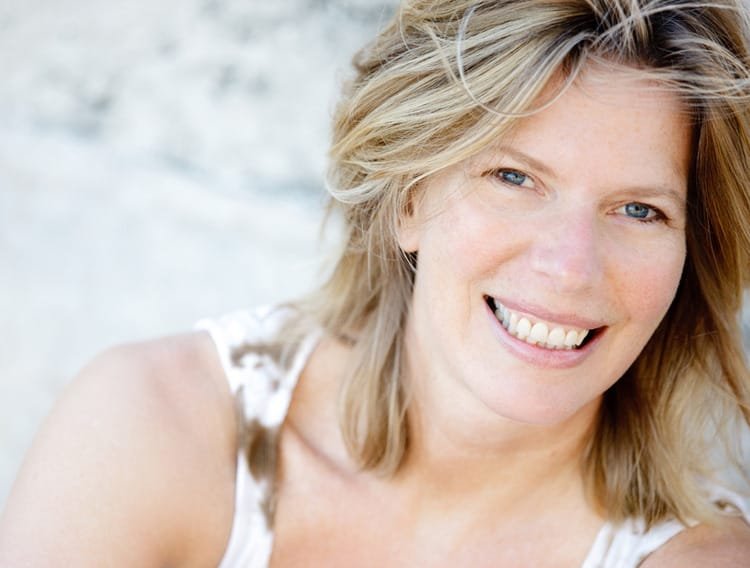
By starting with this simple position – sitting on a stool or chair, Mary feels more comfortable and safe, because she has something to sit on. I move her around until she looks good; try leaning her arms on her knees, turning at a slight angle, etc. Then I use my camera angle, and my position, to move around myself, and take a variety of different shots without moving her much at all.
Here are 4 shots – each made slightly different – by making small adjustments when I take each shot. These “head shots” are more relaxed because she is sitting, rather than standing. If she were standing, she would feel more self-conscious at this early stage in the shoot.
Shots 1 and 2 are virtually the same – only I have turned my camera up the other way on shot 2.
For shot 3 I have asked her to turn her head and look to her right, then for shot 4 I have said, “Don’t move anything, just turn your eyes towards me.” – this is a great trick for making someone’s bone structure look great too – both 2 and 4 are nice shots – but in 4 her face looks slimmer. Not an issue for Mary – but could be for someone with a rounder/fatter face.
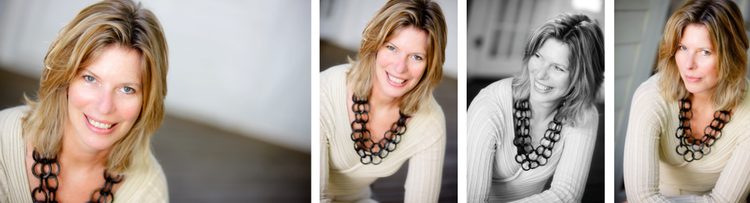
All the shots below were taken using this basic seated position as shown in the video, and then making slight adjustments:

NOTE – All my shots are taken from above, this makes the eyes look bigger, and looking up at me helps to firm up the jawline. They are also taken with the camera slightly tilted to make them look less ordinary.
TOP TIP – Right picture of the girl in the blue shirt – when someone leans on their hand they often squash their skin and wrinkle their eye area – ask them to keep their hand where it is, but take the pressure off their face.
POSITION 2 – Sitting on the floor
Once you’ve got a few head shots, this position will give you more flexibility to be able to shoot a different range of images, often wider than the chair shots above, because you can get more of the person in the shot.

The shots above are all taken by positioning Nicola on the floor as shown in the video above. Careful cropping is vital, as sometimes positions can look awkward as a whole shot – but when you are only shooting a section, it doesn’t matter.
All the shots below are taken by starting with exactly the same basic position as shown in the video above.
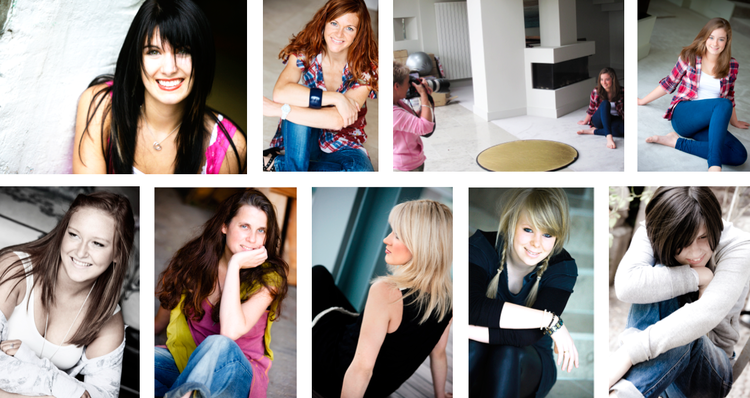
NOTE – Every person is different – if you start with this basic position, then you can move around them to see where each individual looks best.
3. Using these ideas on location
I tend to start shooting in a doorway at home, because the subject is likely to feel less nervous. If you start by shooting on location straight away they will be worried about people seeing them. So once I’ve done my safety shots (as in the two videos above), by the time we get out on location, the client will be feeling much more relaxed.
Below: Mary – now thoroughly relaxed and not worried about people watching her on location!

I firmly believe that to get lovely relaxed shots like these outdoors, you need to start by practising with a person first, in the safety of a place where no one is watching them, and when you’ve done this, they will be so much more relaxed, and you’ll be able to get much more spontaneous and fun shots. If you go back up to the top of this blog and look at the first shots I took of Mary, you will see that, whilst they are lovely shots, she is much more relaxed in these later ones, because she’s been through a process to achieve this.
Try practising these two basic positions and get used to looking at people as details. Work with different parts of them to build up the picture – break it down into looking at parts which then form a whole.
SUMMARY
Find the most flattering light – usually under top shade – a doorway or porch will work fine.
Make sure their clothes are flattering – i.e. not too tight, as this will not good look when seated.
Sit them down either on a chair of the floor (see 2 separate videos) and then move around them to see where they look best, and turn them towards you so you keep the background where you want it.
Start by making their legs look good, moving a foot out slightly or turning their knees – even if their legs will not be in shot, their position will help the rest of the picture.
Ask them to lean on their legs and move them til their arms look good
Turn their shoulders if necessary to create a better shape
Then position their face – by turning their chin etc
Ask them to put their chin down, then out forwards
Finally ask them to look at you and ask for a slight smile, or make them laugh.
Change your camera angle constantly to get a variety of shots without making the person move too much.
RETOUCHING
All images have been put into Lightroom and tweaked slightly.
I have upped the exposure to make them look brighter and more washed out (a look women love!)
They have then had softening added to them, which is done by subtle use of the “clarity” slider (see below)
Then I put the images into Photoshop and soften out the lines around eyes: Create a layer, use the patch tool to drag the area of lines onto a piece of skin with no lines (usually the cheek area) and then use opacity to bring back some of the lines. If you take them away completely it will look fake – just take them away slightly. Check out “99 Portrait Photo Ideas” for how to do this.

NOTE – You can do as much retouching as you like, but I find that people do not want to feel the pictures are cheated – it’s far better to shoot them in the right light and just do a minimum of retouching, just to enhance the pictures. For more details on how much is done in camera, and how much in Lightroom – check out: Do you get the perfect image right in your camera?
For expert teaching on retouching go to: markonurminen.com

NEXT MONTH – 2 more basic positions! Standing and lying on the floor.
For more ideas on positioning women check out: The Bath House Shoot And for older women: Tips for taking a non-traditional portrait of an older person
Videos: Nicola Rudge / Editing: James Robinson